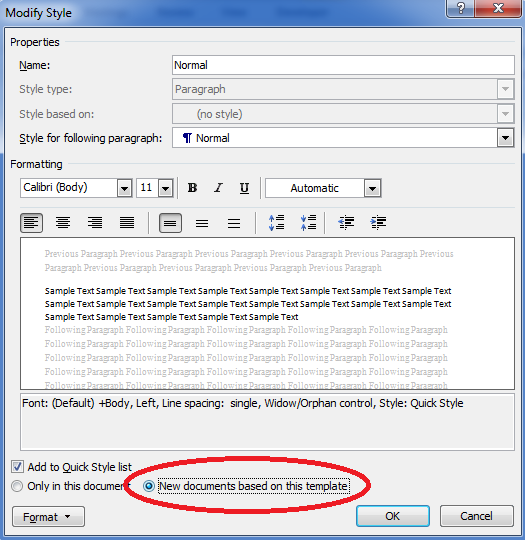
If you want to change your Microsoft Word 2007 default format, it's pretty simple. In my situation, it was defaulting to extra line spacing that I didn't want. Instead I wanted all new documents to default to single spacing by default. In this example I'll show you how to setup single spacing, but this also shows you where to set any of the other default options too.
1. Open Microsoft Word 2007, then on the Home tab, look for Styles. Right-click on the Normal style, then choose Modify
2. At the bottom click the Format button, then select Paragraph
3. Change the Line Spacing dropdown to Single, and also change the After spacing to 0 pt. Then click OK
4. Change the selection at the bottom to "New documents based on this template", then click OK
Of course you can make any modifications you want to through this process, and as long as you select the "New documents based on this template" option before you click OK, your new documents will be based on those settings.
Thoughts, tips, tricks, and fixes for the IT person in you. I am an MCSE and support a wide variety of IT-related items at my job, including: Windows OS's, Exchange, Terminal Services, .NET, IIS, OS X, Microsoft Office, printers, phones, Linux, Adobe Creative Suites, and plenty of other hardware and software. Hopefully some of the solutions I find throughout the workday are useful to you as well
Thursday, October 21, 2010
Wednesday, October 6, 2010
Deploy Firefox using an .msi file and group policy
If you're looking for a Firefox.msi file in order to deploy Firefox using group policy, you don't have to look any further. Ok, I lied a little bit. You're going to have to visit FrontMotion to download one, but then that will be it. You can get the .msi file from http://www.frontmotion.com/Firefox/download_firefox.htm. Currently they're up to date with version 3.6.13. If you're looking to deploy Google Chrome too, check out my other article.
One thing I found though is that the .msi that FrontMotion provides also forces Firefox to be your default browser without prompting you. Maybe that'll work for you if you want to for it to be the default browser, but I only wanted to publish Firefox as an optional browser for users to install from the network. If you're looking to do the same as me, luckily you can create a transform file pretty easily that will fix this for you if you have Orca installed. If not, you can download the Microsoft SDK from http://www.microsoft.com/downloads/en/details.aspx?FamilyID=c17ba869-9671-4330-a63e-1fd44e0e2505&displaylang=en and that includes Orca.
Once you have Orca installed, use it to open the firefox.msi file you downloaded from FrontMotion.com. Then go to Transform->New Transform
Now you can make the changes to the .msi settings. There are three things to change, that I originally found here:
1. In the "Feature" table, find "F_SetDefaultBrowser" and change the level to 6
2. In the "Property" table, find "INSTALLLEVEL" and change the value to 3
3. In the "Registry" table, find "RegKey045" and right-click and choose "Drop Row"
Once you've made those three changes you can create the transform. To do that, go to Transform->Generate Transform...
This will prompt you to name and save your .mst file somewhere. Now you have the .msi and the .mst transform file and you're all set to deploy.
Just like any other GPO software deployment, make sure that you use the network path to your .msi file rather than browsing out to the location. Also, make sure to select Advanced after selecting the .msi file so you can include the .mst file you created under the Modifications tab. I'm assuming that you're familiar with group policy software deployment if you're reading this so I'm not going into those details, but if for some reason you're not leave a comment and I'll try to help. If you're interested in setting policies for Firefox through group policy, download the firefox.adm file from here. Good luck!
One thing I found though is that the .msi that FrontMotion provides also forces Firefox to be your default browser without prompting you. Maybe that'll work for you if you want to for it to be the default browser, but I only wanted to publish Firefox as an optional browser for users to install from the network. If you're looking to do the same as me, luckily you can create a transform file pretty easily that will fix this for you if you have Orca installed. If not, you can download the Microsoft SDK from http://www.microsoft.com/downloads/en/details.aspx?FamilyID=c17ba869-9671-4330-a63e-1fd44e0e2505&displaylang=en and that includes Orca.
Once you have Orca installed, use it to open the firefox.msi file you downloaded from FrontMotion.com. Then go to Transform->New Transform
Now you can make the changes to the .msi settings. There are three things to change, that I originally found here:
1. In the "Feature" table, find "F_SetDefaultBrowser" and change the level to 6
2. In the "Property" table, find "INSTALLLEVEL" and change the value to 3
3. In the "Registry" table, find "RegKey045" and right-click and choose "Drop Row"
Once you've made those three changes you can create the transform. To do that, go to Transform->Generate Transform...
This will prompt you to name and save your .mst file somewhere. Now you have the .msi and the .mst transform file and you're all set to deploy.
Just like any other GPO software deployment, make sure that you use the network path to your .msi file rather than browsing out to the location. Also, make sure to select Advanced after selecting the .msi file so you can include the .mst file you created under the Modifications tab. I'm assuming that you're familiar with group policy software deployment if you're reading this so I'm not going into those details, but if for some reason you're not leave a comment and I'll try to help. If you're interested in setting policies for Firefox through group policy, download the firefox.adm file from here. Good luck!
Tuesday, October 5, 2010
Rotating iPhone or Droid video that always shows sideways (aka landscape) in Windows
We have a few iPhone 4s floating around in our environment, and I have one too. The video is nice, but whenever you try to view it on the computer it shows up in landscape, regardless of how you held the phone while taking the video. I did some research and this seems to be "normal", at least on Windows computers. If you're a Mac user, please leave a comment if this affects you as well. There are two ways to fix this, one that will allow you to open and another that actually converts the video, but neither of the methods are that great in my opinion. Regardless, at least there's a workaround. I just ran into this with someone who has one of the Droids too, and this worked for them as well.
If you only want to be able to view them on your computer
Open the video in Quicktime. I'm going to assume you have iTunes installed since you have an iPhone, and with that you also get Quicktime. I'll also assume that Quicktime is not your default video player or else you wouldn't have needed to look up this article.
You can right-click your video file, then go to Open With... This should give you some options, one of which may be Quicktime. If it is, select it and your video should open in the proper orientation.
If Quicktime isn't an option, select Browse or Choose Default Program (will depend on which version of Windows you're using). There you should be able to find Quicktime and select it to open your video file.
If you want to change Quicktime to always open your iPhone videos, go to Open With..., then click on "Choose default program" or "Select program". From there select Quicktime Player, then make sure the check box is checked that says "Always use the selected program to open this kind of file". That will make Quicktime your default program for .mov files.
If you want the video viewable correctly from any computer
For this you will need to rotate the video. Windows Live Movie Maker can do this for you, but it will also require you convert the video to a .wmv format in order to save the rotated video. You can get it for free direct from Microsoft (http://explore.live.com/windows-live-movie-maker?os=other), or it's part of the Windows Live Essential package that you can download through Microsoft Update.
To rotate the video, open Windows Live Movie Maker and click on "Add videos and photos"
Browse to your video file, select it, then click Open
Now you'll see buttons on the top for rotating 90 degrees in either direction. Use those buttons to rotate your video to the orientation of your liking.
Go to File->Save Movie->High Definition (1080p). Name the new video file and choose where to save it, then click Save.
Movie Maker will go through the conversion process to save your moving in the new format with the proper orientation
Once the conversion is complete, you'll get a message letting you know. Then you can play your new .wmv formatted movie and the orientation will be that which you set a few steps ago.
If you only want to be able to view them on your computer
Open the video in Quicktime. I'm going to assume you have iTunes installed since you have an iPhone, and with that you also get Quicktime. I'll also assume that Quicktime is not your default video player or else you wouldn't have needed to look up this article.
You can right-click your video file, then go to Open With... This should give you some options, one of which may be Quicktime. If it is, select it and your video should open in the proper orientation.
If Quicktime isn't an option, select Browse or Choose Default Program (will depend on which version of Windows you're using). There you should be able to find Quicktime and select it to open your video file.
If you want to change Quicktime to always open your iPhone videos, go to Open With..., then click on "Choose default program" or "Select program". From there select Quicktime Player, then make sure the check box is checked that says "Always use the selected program to open this kind of file". That will make Quicktime your default program for .mov files.
If you want the video viewable correctly from any computer
For this you will need to rotate the video. Windows Live Movie Maker can do this for you, but it will also require you convert the video to a .wmv format in order to save the rotated video. You can get it for free direct from Microsoft (http://explore.live.com/windows-live-movie-maker?os=other), or it's part of the Windows Live Essential package that you can download through Microsoft Update.
To rotate the video, open Windows Live Movie Maker and click on "Add videos and photos"
Browse to your video file, select it, then click Open
Now you'll see buttons on the top for rotating 90 degrees in either direction. Use those buttons to rotate your video to the orientation of your liking.
Go to File->Save Movie->High Definition (1080p). Name the new video file and choose where to save it, then click Save.
Movie Maker will go through the conversion process to save your moving in the new format with the proper orientation
Once the conversion is complete, you'll get a message letting you know. Then you can play your new .wmv formatted movie and the orientation will be that which you set a few steps ago.
Thursday, September 30, 2010
How to flush the DNS cache in Windows and OS X
If you're having problems with DNS, try flushing the local DNS cache. If you don't know what DNS is, this is the service that handles translating domain names, such as google.com, into IP addresses. This allows you to remember the domain name, but then allows the computer to use the IP address to communicate with it. Sometimes DNS settings get changed, but those changes can take a little while to propagate through to everyone system. To speed the propagation along, you can flush your DNS cache manually and force it to reload the most recent settings. To do that in Windows or Mac OS X:
Windows
Open a command prompt (Start->Run->cmd, then OK). Then type ipconfig /flushdns and press Enter
OS X
Open Terminal (Applications->Utilities->Terminal) and type dscacheutil -flushcache then pressing Enter
You should note that this only flushes the DNS cache on your local machine. DNS is a hierarchical system that relies on many different levels of connections, each of which have their own DNS cache. If you manage your own DNS server that would be the next step to diagnosing a problem if flushing the client machine's cache doesn't work. However, that's another topic entirely and this is only meant to give you the quick way to manually flush the DNS cache. If you want to learn more about how DNS works, check out the Wikipedia article, or search online because you'll find plenty of resources.
Windows
Open a command prompt (Start->Run->cmd, then OK). Then type ipconfig /flushdns and press Enter
OS X
Open Terminal (Applications->Utilities->Terminal) and type dscacheutil -flushcache then pressing Enter
You should note that this only flushes the DNS cache on your local machine. DNS is a hierarchical system that relies on many different levels of connections, each of which have their own DNS cache. If you manage your own DNS server that would be the next step to diagnosing a problem if flushing the client machine's cache doesn't work. However, that's another topic entirely and this is only meant to give you the quick way to manually flush the DNS cache. If you want to learn more about how DNS works, check out the Wikipedia article, or search online because you'll find plenty of resources.
Wednesday, September 29, 2010
How to clear your Windows offline files cache
If you are having problems with offline synchronization in Windows and can't seem to get it figured out, you may need to clear your offline file cache. I've also run into problems where there is no other way to stop your offline files from synchronizing, even if you've done what you can to shut it off. I recently had this issue and found the solution at http://offlinefiles.blogspot.com/2010/09/delete-offline-files-cache-windows-xp.html. There are three different way to clear the cache, but the article in the link outlines them all in a very clear way. In my situation I had to use one of the registry hacks because I had a GPO preventing changes to offline files through the menu.
What's taking up your free space? Easily find out using these free tools
Have you ever wondered what is taking up space on your hard drive? If you have, you'll be happy to know that free programs exist which will traverse all your files and folders and give you a hierarchical and graphical view of where your space is being taken up. I recently had a user with 2GB of free space left on an 80GB hard drive, but I could only find 27GB in use. Using one of these programs I found that almost 40GB was showing up as unknown space. That led to some more research to find that IBM's Rescue and Recovery can cause this, and that was exactly the problem. I uninstalled Rescue and Recovery (there was no need for it on the machine anyway) and that made all the unknown space usable space again.
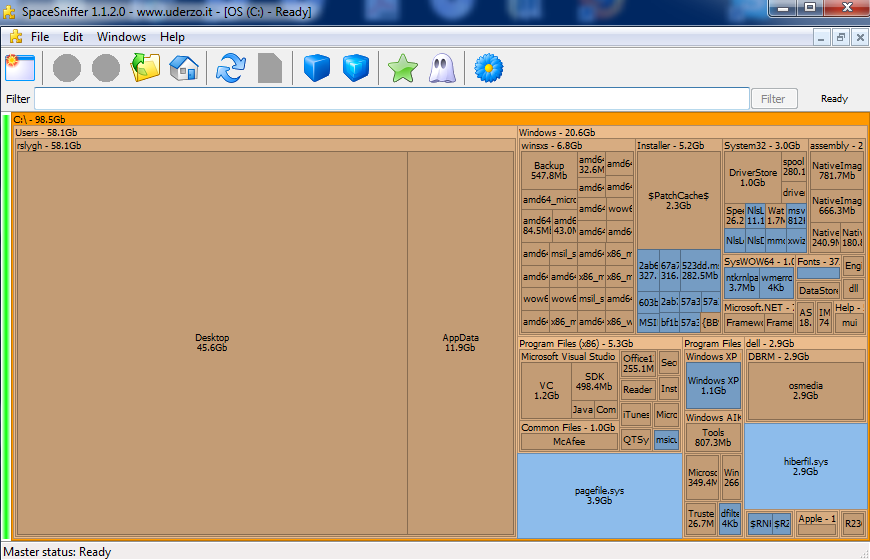
There are many different programs that will give you a graphical representation of file space on your drive(s), but the two I'd suggest are WinDirStat and SpaceSniffer, both of which are free. I prefer the look of SpaceSniffer, and it also comes as an executable so you don't have to install it. Below you'll see a screenshot of SpaceSniffer so you can better understand what I mean when I say it gives you a graphical representation of your hard drive space. If you're wondering just what is taking up space on a drive, give one of these two tools a try and save yourself the time of manually tracking down the culprit.
Wednesday, August 11, 2010
How to change a Windows user's password from the command prompt
1. Open a command prompt window. If you're running Vista or 7 you may have to open the command prompt as an administrator.
2. Enter the command net user username * /domainname or just net user username * if you're not changing a domain user, then press enter. Make sure you substitute your own entries for username and domainname
2a. You could also use net user username newPassword /domainname or net user username newPassword. This will change the password to the newPassword value without prompting you again
3. Enter the new password, then confirm
4. The user should now have the new password set for them
You can find the original article that I used at http://www.petri.co.il, which includes some screen grabs of the command prompt text.
2. Enter the command net user username * /domainname or just net user username * if you're not changing a domain user, then press enter. Make sure you substitute your own entries for username and domainname
2a. You could also use net user username newPassword /domainname or net user username newPassword. This will change the password to the newPassword value without prompting you again
3. Enter the new password, then confirm
4. The user should now have the new password set for them
You can find the original article that I used at http://www.petri.co.il, which includes some screen grabs of the command prompt text.
Friday, July 30, 2010
Extract Java .msi installer for software deployment
If you want to deploy Java software in an Active Directory environment, you can easily use Group Policy to install it on multiple machines. Here's how to get the msi installer file you'll need for the deployment:
1. Download the Java Offline installer from here for the browser you're using. If you don't know whether you're using a 32 or 64 bit browser, go with 32 bit. Not everything runs in a 64 bit browser (yet), so even the Windows 7 64 bit OS still defaults to the 32 bit version of Internet Explorer.
2. Start the Java Offline installer, but don't proceed with the actual install. Starting the installer creates the files you need in a temporary location.
3. Go to your Application Data folder. For each version of Windows it can be a bit different, and it is also a hidden folder
Windows Vista/7: C:\Users\username\AppData\LocalLow\Sun\Java\
Windows XP: C:\Documents and Settings\username\Local Settings\Application Data\Sun\Java\
4. In the Java folder you will find folders for each version of Java you have installed on that machine. Open the one named for the version of Java you want to extract the .msi file from
5. Here you'll find the .msi installer, along with its supporting files. Copy the contents of the folder to a network share and from there you can deploy that version of Java using Group Policy software installation.
Monday, June 28, 2010
Allow standard user to change the time
If you follow best-practice and setup your users as standard users, you may have run into this is before. Standard users aren't allowed to change the time on the computer they are using. However, you can fix this using group policy, or by changing the local policy on the computer. Which method you want to use is up to you, but it's as simple as setting one policy.
5. Enter Administrators and click on "Check Name". This will validate the name and make sure the system is able to find it
6. Administrators should now be underlined, which means everything is correct and the group has been validated. Now you can click OK
7. Click OK again to get back to the screen in step #3. Now repeat steps #4-6 for the group named "Users", and also for "LOCAL SERVICE"
8. That's it. Close your policy editor and now any standard users using the computers affected by the policy should be allowed to set the time on those systems.
Thanks go to this post for pointing me in this direction. I'm still looking for a way to allow users to change the time zone too, but from what I've been finding it's not possible and you have to script it through AD instead.
1. Go into the policy you want to add this functionality to and navigate to Computer Configuration->Policies->Windows Settings->Security Settings->Local Policies->User Rights Assignment
2. Find the "Change the System Time" entry and double-click on it
3. Check the box labeled "Enable this policy setting", then click on "Add User or Group..."
4. Click on the Browse button
5. Enter Administrators and click on "Check Name". This will validate the name and make sure the system is able to find it
6. Administrators should now be underlined, which means everything is correct and the group has been validated. Now you can click OK
7. Click OK again to get back to the screen in step #3. Now repeat steps #4-6 for the group named "Users", and also for "LOCAL SERVICE"
8. That's it. Close your policy editor and now any standard users using the computers affected by the policy should be allowed to set the time on those systems.
Thanks go to this post for pointing me in this direction. I'm still looking for a way to allow users to change the time zone too, but from what I've been finding it's not possible and you have to script it through AD instead.
Friday, June 25, 2010
Replacing or upgrading hard drives in an Apple Drive Module for a Mac server
Replacing the hard drive in an Apple Drive Module (ADM) is relatively simple, at least on an Xserve G5. I wanted to increase the server's storage capacity, so I picked up three Western Digital 1TB Caviar Blue (WD1EALS-00Z8A0) drives. I read a post that says the XServe G5 only supports up to 1TB drives. Otherwise I would've gone with some 2TB drives instead. The true ADMs only come in sizes up to 500GB for the G5 Xserve, and that's what I already have. The hard drives within the modules are Hitachi Deskstar 500GB SATA drives (HDS725050KLA360). I saw SATA and figured it must be pretty easy to swap them, and it turns out I was correct. However, there are some pros and cons of using stock, third-party hard drives in your Xserve G5. If you want to read the article I found, check it out here. Otherwise, here's the quick version
Pro - cheap, readily available
Cons - lack Apple-specific firmware, normally aren't server-grade drives, they haven't been tested by Apple, and the rubber washers on the ADMs are supposedly specific to certain drives for reducing vibration
Looking at that list I chose cheap. The only cons that would be a little concerning are that they're not server-grade drives, and they don't have the Apple firmware. However, the drives showed up in Server Monitor like normal so I don't know how much of an issue the generic firmware would cause. You could always test the drives yourself, and I don't think a different type of rubber washer is going to change the vibration in my drives enough to worry about it. It's up to you to gauge whether this is a good idea for your particular situation. For me it was fine so I proceeded with the swap. I have a Dual 2.3GHz G5 Xserve, which happens to use SATA drives. If yours is a different model you'll want to double-check what type of drives you need first. The ADM has a special connector on it for where it plugs in to the server., but it's just an additional interface and is not specific to the hard drive you buy. In my case the connector looked like this
Anyway, on to the hard drive swap. Here's how I did it:
1. Remove your ADMs from the server. Make sure to label the drives in them if they're in a RAID configuration so you can put them back in in the correct order if you need to. Putting them in in the wrong order will break your RAID. At this point you will have to
2. Once the drives have been labeled, take one and start removing the screws. There are four screws, two on each side. Remove them in whichever order you prefer. I removed one side first, then flipped it over and removed the other
3. Once the screws are removed you're going to have to remove the drive from the ADM. Set the drive flat on your work surface. Lift it up from the back of the drive, which is the side with the spring latch you used to remove it from the server. It should come out easily.
4. The SATA connectors will be on the front side of the ADM/drive, so flip the drive 180 degrees so it sits on its top. This will give you clear access to the SATA connectors. Unplug them
5. Now you have an empty ADM sled. Simply perform the steps in reverse. Plug in the connectors, flip the new drive into the sled, put the four screws back in and you're done.
This will leave you with an ADM with a new hard drive. Go ahead and repeat for any additional hard drives you're going to swap. Then put the ADMs back in your server and boot to the OS X Server install CD/DVD to get on with installing OS X Server. Don't worry if your server starts beeping at you after you've put in the new drives. That's the megaraid controller alarm letting you know that something is different than it expected with the drives. You can shut that off by going into Terminal after booting from the CD and using the command megaraid -alarm -silence. You'll have to use the megaraid program through the Terminal for configuring your new RAID array as well. For some examples of a configuration using the megaraid program, check out http://images.apple.com/server/docs/Using_Hardware_RAID.pdf. Otherwise you can enter megaraid in Terminal and see the few command line switches are enough to get you going. Good luck!
Pro - cheap, readily available
Cons - lack Apple-specific firmware, normally aren't server-grade drives, they haven't been tested by Apple, and the rubber washers on the ADMs are supposedly specific to certain drives for reducing vibration
Looking at that list I chose cheap. The only cons that would be a little concerning are that they're not server-grade drives, and they don't have the Apple firmware. However, the drives showed up in Server Monitor like normal so I don't know how much of an issue the generic firmware would cause. You could always test the drives yourself, and I don't think a different type of rubber washer is going to change the vibration in my drives enough to worry about it. It's up to you to gauge whether this is a good idea for your particular situation. For me it was fine so I proceeded with the swap. I have a Dual 2.3GHz G5 Xserve, which happens to use SATA drives. If yours is a different model you'll want to double-check what type of drives you need first. The ADM has a special connector on it for where it plugs in to the server., but it's just an additional interface and is not specific to the hard drive you buy. In my case the connector looked like this
Anyway, on to the hard drive swap. Here's how I did it:
1. Remove your ADMs from the server. Make sure to label the drives in them if they're in a RAID configuration so you can put them back in in the correct order if you need to. Putting them in in the wrong order will break your RAID. At this point you will have to
2. Once the drives have been labeled, take one and start removing the screws. There are four screws, two on each side. Remove them in whichever order you prefer. I removed one side first, then flipped it over and removed the other
3. Once the screws are removed you're going to have to remove the drive from the ADM. Set the drive flat on your work surface. Lift it up from the back of the drive, which is the side with the spring latch you used to remove it from the server. It should come out easily.
4. The SATA connectors will be on the front side of the ADM/drive, so flip the drive 180 degrees so it sits on its top. This will give you clear access to the SATA connectors. Unplug them
5. Now you have an empty ADM sled. Simply perform the steps in reverse. Plug in the connectors, flip the new drive into the sled, put the four screws back in and you're done.
This will leave you with an ADM with a new hard drive. Go ahead and repeat for any additional hard drives you're going to swap. Then put the ADMs back in your server and boot to the OS X Server install CD/DVD to get on with installing OS X Server. Don't worry if your server starts beeping at you after you've put in the new drives. That's the megaraid controller alarm letting you know that something is different than it expected with the drives. You can shut that off by going into Terminal after booting from the CD and using the command megaraid -alarm -silence. You'll have to use the megaraid program through the Terminal for configuring your new RAID array as well. For some examples of a configuration using the megaraid program, check out http://images.apple.com/server/docs/Using_Hardware_RAID.pdf. Otherwise you can enter megaraid in Terminal and see the few command line switches are enough to get you going. Good luck!
Subscribe to:
Posts (Atom)