Monday, January 17, 2011

Deploying Quicktime fails with "A newer version of Quicktime is already installed"

UPDATE 10/13/2011: iTunes 10.5 doesn't require Quicktime to run anymore, so hopefully this problem disappears, but if you're still having trouble this article should help. If this doesn't solve your problem you can also try using the Windows Installer Cleanup Utility. Microsoft pulled this from it's list of available downloads citing the potential for problems (so this is your warning), but MajorGeeks.com still hosts a copy and that's where the link above will take you. Download and install the utility, then run it and remove any references to Quicktime it finds. You may even find some other unneeded programs leftover that you didn't see in the Add/Remove Programs list. After removing the Quicktime entries try running your modified installer that you create using the directions below.

Original Post

I ran into this issue while trying to deploy iTunes using group policy. Luckily a little digging in the msi file led me to a quick fix through the use of a transform of the original msi. If you have an easier fix please share in the comments. In order to do this you'll need Orca (which you can get from here), or another MSI editor installed. This should work on a personal machine as well, but you likely don't have a Quicktime.msi file yet so you'll want 7-zip installed in this case. Here's what I did that worked for me

If you don't have a Quicktime.msi file, start here. Otherwise skip to step #3 if you already have it, whether through iTunes or as a standalone

1. Download Quicktime from Apple

2. Right-click the QuickTimeInstaller.exe file and select 7-zip->Extract to QuickTimeInstallere. This will create a folder named QuickTimeInstaller containing some files, one of which is the Quicktime.msi that you need.


3. Open Orca, then go to File->Open, and browse out to your Quicktime.msi file

4. In the Tables column on the left, find the entry named "InstallExecuteSequence" and click on it.


5. On the right-side, look for "PreventDowngrade" in the actions column. This should be set to 1. Change this value to 0


6. Now save your newly modified .msi file


7. Close Orca and run the modified version of Quicktime.msi.

This should allow Quicktime to overwrite whatever other information it may be finding on your computer, which will bypass the error and get your Quicktime install back in working order.

Deploy iTunes 10.4 or 10.5 using group policy GPOs

UPDATE 10/12/2011: With yesterday's release of iTunes 10.5, iTunes no longer requires Quicktime. You can ignore all references to Quicktime below if you'll be deploying iTunes 10.5. You can still deploy Quicktime if needed in your environment, but it should be treated as a separate deployment

Original Post

Having an organization filled with iPhones, I end up managing a lot of iTunes installs. I've slowly been revoking admin privileges from users and have been providing network installation packages for most common software, but iTunes has been a bit problematic. After finding a couple of useful articles this past weekend, I decided to write my own with the steps I used to finally have a successful deployment of iTunes. The particular version of iTunes I'm deploying is 10.1.1.14, for both 32-bit and x64 Windows (XP, Vista, and 7). During the deployment I'm also stripping out Apple Software Update and Bonjour because they're not needed for anything we do.

First off, here are the helpful links I tracked down. Apple has an Enterprise Deployment guide for iPhones, which includes a little about deploying iTunes. You can find it here. I also found another paper about deploying iTunes in a corporate setting, and you can see that here. Neither included the full set of steps I needed to use, and I had to add a few of my own, so here is my own rendition of deploying iTunes.

To start you have to download iTunes, and you also need to have Orca (which you can get from here) or some other MSI editor. If you just want to deploy Quicktime the steps are very similar, but you can download the Quicktime installer. In order to use this guide, you'll also need 7-zip for extracting the .msi files from the .exe. It's not completely necessary since you can get the msi files from a temp folder, but it is quicker and 7-zip is a good tool to have anyway. From this point on I'm going to assume you have all three items downloaded, and both 7-zip and Orca installed on your machine. I'm also going to assume you're familiar with deploying software using group policy, and that you have a software deployment share setup somewhere on your network. 

1. Right-click on iTunesSetup.exe and choose 7-zip->Extract to iTunesSetup. This will extract the .exe file into a folder called iTunesSetup in the same location. This folder will contain the .msi files you will need.


2. This will extract the .exe file into a folder called iTunesSetup in the same location. This folder will contain the .msi files you will need. Go into the iTunesSetup folder

3. The only files you need are AppleApplicationSupport.msi, AppleMobileDeviceSupport.msi, Quicktime.msi, and iTunes.msi. You can keep the others or delete them, whichever is your preference. Quicktime and AppleApplicationSupport are the same for both x32 and x64, so you won't need to change these at all. However, if you'll be deploying both x32 and x64 versions, you'll want to make sure to note AppleMobileDeviceSupport.msi and iTunes.msi with which version they're for because these are different depending on your architecture. If you're only deploying Quicktime, you only need AppleApplicationSupport.msi and Quicktime.msi from the folder that you end up with.


4. Now you need to fire up Orca and edit all four .msi files to use the language you need. According to the guides I read you can do this in the GPO, but that didn't work for me so I'd suggest doing it in both places. Start Orca, then go to File->Open, and open iTunes.msi.

5. Once the .msi opens, go to View->Summary Information... This will be where you eliminate all unneeded languages


6. In the Languages box, delete all but the language you need. US English is 1033, which is the only language code I would leave in the box. To lookup other language codes, please check out this MSDN article. Use the value in the HexLCID Dec column. Once you're done click OK


7. Save the .msi file.


8. Repeat steps #4 through #7 on the remaining three .msi files (AppleApplicationSupport.msi, AppleMobileDeviceSupport.msi, and Quicktime.msi).

If you want to install Bonjour and Apple Software Update you'll want to skip down to step #12. However, I'm going to guess since you're going through the trouble of deploying this you don't need them either.

9. Reopen iTunes.msi with Orca and go to Transform->New Transform


10. In the Tables column to the left, scroll down and click on "caPackage". In the right-hand window, right-click and select Drop Row on both AppleSoftwareUpdate and Bonjour. This will put a line through them to show that they will be removed.


11. Using that same idea go to LaunchCondition and drop the row with condition NOT BNEWERPRODUCTISINSTALLED. To auto-accept the license agreement go to the Property table and change the property IAcceptLicense to Yes. Also, under the Property table change property SCHEDULE_ASUW to 0. ASUW is the Apple Software Update service, and setting it to 0 shuts that off. There are some other optional settings you can add to your iTunes transform if too if you'd like. If you do not want shortcuts added to the desktop, go into the Component table and change the condition of component iTunesDesktopShortcuts to DESKTOP_SHORTCUTS="0". That's the only other one I have, but you can search Google for more if you want to try to change other settings too.

12. Once you have your changes to the installer all set up, go to Transform->Generate Transform. Name your transform file and save it. I suggest naming it iTunes.mst and saving it in the iTunesSetup folder with all the msi files, but that's up to you.


13. Repeat steps 9, 11, and 12 (skip 10) on AppleApplicationSupport.msi and AppleMobileDeviceSupport.msi to create transforms for each of them. You only need to do the first two things from step 11 though (drop NOT BNEWERPRODUCTISINSTALLED and change IAcceptLicense to yes).

13. Now you're ready to start creating GPOs. Copy the .msi files and your .mst transform files out to your software deployment share on the network

14. Login to the computer you're going to use to create your GPOs. You'll need a separate GPO for each .msi because they need to be installed in a particular order. Go ahead and create your four GPOs now. If you don't already have it, Group Policy Management console is really useful when you have multiple policies to manage. It's also what I'll be using in the directions

15. In the iTunes GPO, add your software package making sure to select Advanced when given the Assigned, Published, or Advanced options

16. You can set the software deployment settings however you'd like, except for the following. Go to the Deployment tab and click on the Advanced button. Check the box for "Ignore language when deploying this package", and also uncheck "Make this 32-bit X86 application available to Win64 machines" (if it's there)


17. Make sure to include your transform iTunes.mst to eliminate Bonjour and Apple Software Update. You have to do this with the initial package configuration, or else you have to recreate it. Go to the Modifications tab, click Add, then browse out to your iTunes.mst file.


18. That's it for iTunes.msi, as long as you configured the other settings to however you want them. Now you have to repeat steps 14 and 15 for your other three .msi files, making sure to tell the packages to ignore the languages. For Quicktime.msi and AppleApplicationSupport.msi, leave the box checked for "Make this 32-bit X86 application available to Win64 machines" since they don't have separate x64 versions. Make sure it's unchecked though for both iTunes and AppleMobileDeviceSupport.

19. Once you have your GPOs setup all that is left is to order them properly. They must be installed in a particular order, which is:

a. AppleApplicationSupport
b. AppleMobileDeviceSupport
c. Quicktime
d. iTunes

so your group policy order should look something like this

NOTE 9/22/11: I originally had an incorrect screenshot posted, but this one is correct. The link order determines the priority of that GPO's inheritance, so when you're installing items in a particular order you want it to be setup backwards because the highest link order will be the last thing to be installed. It does not install the highest link order first. Thanks to Matthew L. Christy for pointing this out in the comments below.


That's it for the important stuff, however there are some additional notes I'd like to make because I still ran into a few issues after this point. In case you run into them as well, I'd advise you to keep reading or bookmark this article so you can come back to it later. I hope this was useful

1. Getting an iPod service error during the iTunes install seems to be normal. I have safely ignored it and have not seen any adverse effect yet

2. Each time you deploy a new version of iTunes you will need to edit the msi files for the language, just like you did in steps #4-7. If you know of a way to save the language info in a transform let me know and I'll update the instructions

3. When deploying a new version, make sure to also apply your iTunes.mst transform to the new version of iTunes. You don't have to recreate the mst file every time, at least not until Apple changes the installed format and the caPackage table disappears

4. If you run into an issue installing Quicktime thats says there's already a newer version installed I have a workaround. First make sure Quicktime isn't installed, and if it is uninstall and try again. If it isn't installed and you get the error, then check out my other article for a workaround using another transform file

5. You can assign or publish all the msi files needed to deploy iTunes. If you publish them, which is what I did, make sure your users are aware of the proper order of installation.

6. To deploy both 32-bit and x64 versions, go through the same process but include both versions of iTunes.msi and AppleMobileDeviceSupport.msi through your GPOs. Using the "Make this 32-bit X86 application available to Win64 machines" check box allows you to control which one goes to which type of machine.

Wednesday, January 5, 2011

SQL Execution Error when creating a view from a linked server in Management Studio

In my particular case, I'm using SQL 2005 SP4 to create a linked server to a SQL 2008 server. However, I know this happens in SQL 2008 as well. I was able to create linked servers without any problems in both SQL 2005 and SQL 2008, and I could query the tables on a linked server just fine, but if I tried to create a view using the Management Studio view creator I would get a SQL execution error that looks like this


In this case I was creating a view to a table on the linked server using [192.168.1.70].sqldb.dbo.tablename. For some reason when I tried executing or saving the view, the brackets surrounding my linked server were automatically getting removed. Luckily there is a workaround for this, which I found on stackoverflow.com. If you manually create the view within the query window, it will work. So what I did next was open a query window and entered the following

CREATE VIEW myView
AS
SELECT * 
FROM [192.168.1.70].sqldb.dbo.tablename
GO


Then I ran that query and it was successful. Refreshing the list of views available showed the view "myView", and I was able to use it like normal. However, if I opened the view in the view designer, the brackets were still missing and it would throw the same SQL Execution Error as above.

Thursday, December 30, 2010

Fix event ID 13559 problem on a Windows server

After migrating a standalone Windows domain controller to a VMWare environment, I noticed that some group policy objects weren't being enforced. It turned out some of the GPOs were missing from the SYSVOL share because it wasn't replicating on the newly virtualized DC. After checking the directory service event logs I found repeated entries for event ID 13359, stating

"The File Replication Service has detected that the replica root path has changed from "c:\windows\sysvol\domain" to "c:\windows\sysvol\domain". If this is an intentional move then file with the name NTFRS_CMD_FILE_MOVE_ROOT needs to be created under the new root path."

I didn't change the location of sysvol, and according to the event the sysvol location was changed to the same location. I did a little research and found that all I needed to do was listen to the event description and create the file requested. There's also KB 819268, but I didn't really find it useful. To fix the problem here's what you should do, assuming you have another domain controller that you can pull a new set of SYSVOL data from

1. Create a file named NTFRS_CMD_FILE_MOVE_ROOT in the directory listed in the event description where the replica root path has been moved to. In my situation I created a text file with that name in the C:\WINDOWS\SYSVOL\domain directory on the domain controller.

2. Restart the File Replication Service, either through services.msc, or with "net stop ntfrs" then "net start ntfrs" through the command prompt.

Now if you check your event log you'll find a warning that you're DC is going to be removed from the SYSVOL replica group, which is good. It'll automatically add it back to the group and start replicating the SYSVOL contents from another DC. Be patient and don't try to force a replication with replmon though as you'll want to wait until your server has been added back to the SYSVOL replication group first.

Wednesday, December 22, 2010

Deploy Google Chrome using .msi file and Group Policy

To get started you can download an .msi installer file directly from Google at http://www.google.com/chrome/eula.html?msi=true. That's really about it. Then deploy like normal and you can either publish or assign Google Chrome.

If you want to deploy Firefox using an msi, check out my previous post.

Thursday, December 2, 2010

Create subgroups of contacts in Outlook

If you have a lot of contacts in your Outlook Contacts, you may wonder what you could do to try to organize those entries. One suggestion would be to create subfolders of contacts so you can group them together so you have multiple smaller groups, which should make it easier to locate a contact. You could always just use the search feature as well, but if you're looking to organize your contacts here is a way to do it.

1. Open Outlook and go into Contacts


2. Click on File->New->Folder...


3. Choose "Contact Items" in the Folder Contains drop-down (it should be there by default), give the subgroup a name, then pick where to store it in your mailbox. I would suggest creating it as a subfolder of your Contacts folder.


4. You'll see the new contact group in the My Contacts section, and you can add contacts to your new subgroup by either creating new within the group or dragging existing contacts into it.


Now you can click on the Group to quickly find the contacts you placed in it. If you'd like to use this group to find contacts while composing an email, there is another step you must take to make it available as an address book list.

1. Right-click your newly created subgroup and go to Properties


2. Click on the "Outlook Address Book" tab and check the box that says "Show this folder as an e-mail Address Book", then click OK


3. Now your subgroup will show up as a selectable Address Book for you to use when adding recipients to an email or calendar invitation


If you noticed the different icons on the contact groups within Contacts, you're in luck because I have the answer for you. This distinguishes where the group exists. If it has the hand holding a contact card, that means it is synchronized with the Exchange server, such as Contacts and ContactsSubgroup in the screenshot above. The ones with blue arrows are contact lists I have open from another Exchange account, and in the screenshot they are from the Administrator mailbox. If the icon is just a contact card, this means it is locally stored within a .pst file. If you're looking to use the subgroup from Outlook, webmail, a mobile device, etc, you will have to make sure to create your subgroup in your Exchange account so you get the hand holding a contact card icon. Otherwise you won't be able to use the group within webmail or your mobile device, but they will be available on the computer running Outlook where you created the group.

Sunday, November 21, 2010

Setting remote desktop timeouts in the registry

If you're using terminal server you should be using the terminal server settings, or even better, group policy. However, if you are running an XP Pro install without a domain the only option is to modify the registry. Or if you have a domain but just want to change one XP Pro install it can be easier to do the registry modification instead of setting up a GPO for the single desktop. In my case there are two people with individual accounts accessing a single XP Pro computer remotely on occasion, but one of the two always leaves their session open so the other can never just log in without forcing the other's session closed. I set up an idle timeout on the XP Pro computer so now neither of them are allowed to let their session sit idle for too long.

You can change just about any remote desktop setting from within the registry, but the main two you're likely looking for since you're reading this post are MaxDisconnectionTime and MaxIdleTime. They can be found in the registry under:

HKEY_LOCAL_MACHINE->SYSTEM->CurrentControlSet->Control->Terminal Server->WinStations->RDP-TCP

MaxDisconnectionTime is how long a session that has been disconnected can be kept alive. It is useful if you have users that like to click the X on the RDP bar rather than logout. MaxIdleTime is for how long an idle session stays alive, just in case you have users who should be logging out but always stay logged in regardless of whether they're doing anything or not. These values are set in milliseconds, and make sure to enter your value in decimal (unless you figured out your value in hex, but I'm going to guess most people wouldn't bother with that). If you want to limit the overall connection time, you could change MaxConnectionTime to define a limit for that as well.

In my example above, since I didn't want either user staying logged in to this particular computer, I set MaxIdleTime to 2 hours, which is actually a value of 7,200,000 in the registry (2 hrs * 60 min/hr * 60 sec/min * 1,000 millisec/sec). That way if their session is idle for 2 hours they get disconnected automatically and no one has to worry about forcing the other session closed.

Tuesday, November 9, 2010

Merge, extract, split, or rearrange your PDF files for FREE!

I love free software that is useful, and today I found PDFsam (PDF split and merge). It's an open-source program available direct from PDFsam.org, or through Sourceforge, that allows you to perform various actions such as merging and rearranging on PDF files. Normally this would require Adobe Acrobat Pro, which is pretty expensive. Instead you could use PDFsam and accomplish most of the common things a person normally buys Acrobat Pro to do. It does require Java, but you can download and install that for free from http://java.com, so that shouldn't be an issue. There are also installers for Windows, Mac OS X, and Linux, so it's pretty widely available.

The program might not be as pretty as Acrobat, but it seems to still work pretty well and isn't hard to figure out if you click around a little. I tried a couple of test runs with the merge and did have an issue with one, but the other worked just fine to create a new document. This makes me think PDFsam still has a few bugs, but it's still worth having in your arsenal.

If you're just looking to create PDF files from existing documents, check out my other post about DoPDF.

Viewing Illustrator files on a Windows PC for free

Using free, open-source software, you can view Adobe Illustrator .ai files and .eps files on your Windows PC. It's pretty simple too. If you're looking to modify the files this isn't going to help, but as long as you need read-only access this is a great way to avoid paying for the expensive Adobe Creative Suites package.

1. You need to download three packages: Irfanview, the Irfanview plugins, and Ghostscript. You can get Irfanview and the plugins from http://www.irfanview.com/, and Ghostscript through http://sourceforge.net/projects/ghostscript/

2. Install the three programs in the order above. First Irfanview, then the plugins, then Ghostscript. The default settings are fine, but keep an eye out for checkboxes trying to install other software that you don't need, such as toolbars

3. Once the programs are installed you're ready to open your file. Right-click the .ai or .eps file and choose "Open With". From there select Irfanview from the list. If it's not there choose Browse (or "Choose default program..." first, then Browse if on Windows 7), then locate the i_view32.exe (Irfanview program executable) file. It should be located in C:\Program Files\Irfanview\i_view32.exe. Click Ok. If you have a 64-bit version of Windows, the Irfanview executable is likely in the C:\Program Files (x86)\Irfanview folder instead

4. If you want to set this as the default program for all .ai or .eps files (you'll have to do each separately), check the box labeled "Always used the selected program to open this kind of file", then click OK

You should now be able to view .ai and .eps files for free on your Windows PC. This may not work for every file as the postscript decoding isn't perfect, but I don't complain when it's free.

Thursday, October 21, 2010

How to change the Microsoft Word 2007 default format

If you want to change your Microsoft Word 2007 default format, it's pretty simple. In my situation, it was defaulting to extra line spacing that I didn't want. Instead I wanted all new documents to default to single spacing by default. In this example I'll show you how to setup single spacing, but this also shows you where to set any of the other default options too.

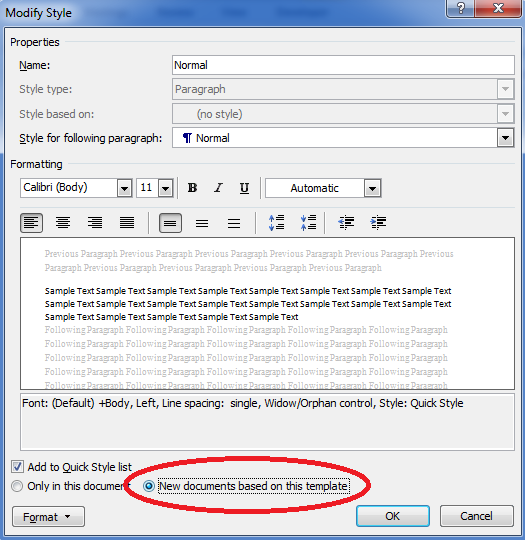
1. Open Microsoft Word 2007, then on the Home tab, look for Styles. Right-click on the Normal style, then choose Modify


2. At the bottom click the Format button, then select Paragraph


3. Change the Line Spacing dropdown to Single, and also change the After spacing to 0 pt. Then click OK


4. Change the selection at the bottom to "New documents based on this template", then click OK


Of course you can make any modifications you want to through this process, and as long as you select the "New documents based on this template" option before you click OK, your new documents will be based on those settings.