I needed to make some changes in Registry Editor on a machine, but didn't want to log out of the users account to get in as the admin. It's good that you can open a program such as Registry Editor via the Run box using the command "runas". Doing so allows you to start an application while providing administrative credentials, without the need to log out of the currently logged in user. In most cases you can right-click an application icon and choose "Run As...", but for something like Registry Editor you would either have to save a custom MMC or use this runas method.
The syntax is:
runas /user:localhost\administrator regedit
This will then prompt you for the administrator password, and assuming you know it, will give you access to the Registry Editor as an administrative user. You could also write this into a batch file and use that as a shortcut if you didn't want to type this into the Start->Run box each time you needed it.
To see the original article I found outlining this, along with more information about the batch file, check out this www.tech-recipes.com article.
Tuesday, December 29, 2009
Wednesday, December 23, 2009
View message size in Outlook Web Access
I had a user with access only to Outlook Web Access who was trying to sort the message by size, but there didn't seem to be a column for that within the OWA interface. I did some quick searching and saw a lot of people saying that it's not possible. However, I was surprised at how simple it is to do after reading how many people said it couldn't be done. This post pertains to OWA running on an Exchange 2003 server, and you also have to be using the premium client which only runs within Internet Explorer. Other browser will use the basic client and that doesn't allow you the same flexibility as the premium client.
1. Login to your mailbox via the Outlook Web Access webpage
2. At the top of the page to the right of where it says Inbox, click and change the view to Messages

That's it. Now you should see a column labeled Size that you can use to sort the messages. If you're looking for other options, try one of the other predefined views available from the list.
Tuesday, December 22, 2009
Remove or upgrade a Macbook Pro hard drive
I had a user with a Macbook Pro who had a hard drive that was about to fail. The hard drive was almost full too, so I wanted to make sure to upgrade it in the process. I was surprised at how easy it was to do, and found a very helpful guide with pictures for disassembling the Macbook. Normally I'd repost the disassembly instructions here, but the guide at www.extremetech.com was done so well I'll redirect you there instead.
I removed the existing hard drive using the guide, then cloned it to the new hard drive using Disk Utility from a Mac desktop. I put one of the drives right inside the case, and used a SATA to USB converter (~$20 for a combo IDE 2.5", IDE 3.5", and SATA to USB, and well worth it) to plug the other drive in. From there I was able to restore the existing drive on to the new drive. It looks like even though the new drive had a much larger partition (80GB existing to a 250GB new drive), Disk Utility took care of that as well and I have a full 250GB of usable space on the new drive after the restore. After I put it all back together and booted up the laptop, everything seems to be working ok and now the user has an extra 160GB to fill up and the clicking is gone.
I removed the existing hard drive using the guide, then cloned it to the new hard drive using Disk Utility from a Mac desktop. I put one of the drives right inside the case, and used a SATA to USB converter (~$20 for a combo IDE 2.5", IDE 3.5", and SATA to USB, and well worth it) to plug the other drive in. From there I was able to restore the existing drive on to the new drive. It looks like even though the new drive had a much larger partition (80GB existing to a 250GB new drive), Disk Utility took care of that as well and I have a full 250GB of usable space on the new drive after the restore. After I put it all back together and booted up the laptop, everything seems to be working ok and now the user has an extra 160GB to fill up and the clicking is gone.
Thursday, December 17, 2009
Slipstream Office 2007 service packs into install package
You can integrate updates into your Microsoft Office 2007 installation the same way you can slipstream updates into your XP install disk. This is very helpful if you manage an environment of computers that would otherwise need to individually download and install the update files. It's also really easy to do. For this example, I'll use Office 2007 service pack 2, which is the most recent available right now.
1. First, download and save Office 2007 SP2 from Microsoft.com. You will need this file in order to get the updates it contains. For example's sake, let's say you named the saved file Office2007Updates.exe and saved it to the root of your C drive.
2. Create a folder on your C drive named Extract, and another named Updates. This is where you will put the updates from the SP file. Also, move the Office2007Updates.exe file into the newly created Extract folder.
3. Open a command prompt (Start->Run->cmd) and enter the following commands, each followed by pressing Enter:
cd C:\Extract
Office2007Updates.exe /extract:C:\Updates
This will extract the updates from the service pack file into the C:\Updates folder. You can now delete the Extract folder
4. Now you need to move the contents of your Updates folder into the Updates folder found in your Office 2007 installation media. This is easy if you're using a network location for pushing out the software. However, if you are only using the CD you will have to download the files from it to your computer to complete this step.
5. Once you have the Office installation files saved in a location, move the contents from the C:\Updates folder to the Updates folder within the Office install files.
6. You can now use the install files as they are, or you can burn the newly created install to a CD so you have a portable copy. During the install it will automatically check the Updates folder and apply any updates it finds within.
The original post that I found detailing this process can be found at winsupersite.com
Friday, November 20, 2009
Installing Windows XP in a VMWare ESXi environment, no hard disks found error
If you attempt to install Windows XP in an VMWare ESXi environment (at least v3.0-3.5), don't be surprised if you get an error about no hard disks available. This is because you need to manually install SCSI drivers for the VMWare disks. Luckily VMWare provides a floppy image for this purpose and it's free to download. Simply mount the image as a virtual floppy, then press F6 when the Windows install screen tells you to "Press F6 if you need to install third-party SCSI drivers" at the beginning of the install. Press S when prompted to specify the drivers and you should see VMWare SCSI driver as the only option. Press Enter and then proceed with the install.
Here's a link to the VMWare knowledge base document addressing this issue: http://kb.vmware.com/kb/1006956
You can download the floppy image of the drivers from the link in the KB article linked above, or from this VMWare support page: http://downloads.vmware.com/d/details/scsi_dt_server_wkst_ace/dCpiQGh3YmRAZQ==
Monday, November 16, 2009
Scripting a file transfer to an FTP server using a non-standard port (not 21)
I ran into an issue last week while trying to automated a file upload to an FTP site using a port other than the default of 21. For some reason I couldn't get it to work. It would continually get stuck at "150 Opening ASCII mode data connection". Checking the logs I was finding a 425 10060 error, which meant that the connection was being dropped. There were ghost files of 0KB being created on the FTP with the name of the file I was trying to upload, but the transfer would never happen. The good news is that I figured out the issue and am now sharing it with you.
It turned out I needed to use passive mode (PASV) for the FTP transfer and that isn't supported in the Windows ftp.exe command line application. In order to accomplish my upload I had to download and install NcFTP, which is a free, command-line client that DOES support PASV mode transfers. Once I did that I had no issue. If you're looking for the command to use with NcFTP to upload a file to an FTP server with a non-standard port, here's an example.
I have a file named test.txt located in C:\myFolder on the machine. I also have NcFTP installed to the default location. My goal is to upload test.txt to an FTP site called ftp.test.com that is using port 35987. I also have to login to the site using username "test" and password "T3ster!". Here's what that would look like using ncftpput.exe to script the upload:
"C:\Program Files\NcFTP\ncftpput.exe" -u test -p T3ster! -P 35987 ftp.test.com / "C:\myFolder\test.txt"
This calls ncftpput.exe, sets the username (-u) to test, the password (-p) to T3ster!, the port (-P) to 35987, specifies the FTP server, specifies the directory on the FTP server to put the file to (I used the root FTP directory, signified with the / symbol), then specifies the path on the local machine to the file I want to upload.
That is just a quick example. There are variations, and you can also do other things with it as well. To see more information, including a link to the complete list of available command line switches for ncftpput.exe and ncftpget.exe, check out the my previous post
Windows command line FTP client that support PASV (passive mode)
If you're trying to write an FTP transfer into a script and require a command line client that support passive mode transfers, you'll need a third-party solution. This is because ftp.exe that is built into Windows does not support passive mode. Luckily, there is a free third-party solution that works pretty well and I'm now using it for some of my scripts. It is NcFTP, and is a Windows adaptation of a Linux application. It has versions for multiple OS's, one of which is Windows. You can download it free from http://ncftp.com/download/, then scroll down to the Download NcFTP Client section and find the Windows download link. If you're wondering, NcFTP also provides an FTP server application at the same download location.
There is an installer involved, which will install ncftp.exe, ncftpput.exe, and ncftpget.exe. Using some switches, you can then use ncftpput.exe and ncftpget.exe to script transfers to and from FTP servers, including those that only support passive mode.
For command line switches and additional documentation, it can be found at http://www.ncftp.com/ncftp/doc/faq.html.
Friday, November 6, 2009
Restart Windows XP Print Spooler service
Sometimes you may find it helpful or necessary to restart the print spooler on your Windows XP computer. This can happen if you're having issues with a printer, or if a job gets stuck in the queue and you can't delete it. To restart the print spooler:
1. Right-click the My Computer icon and select to Manage
2. Go to Services and Applications->Services
3. Within Services, scroll down until you get to Print Spooler
4. Right-click on Print Spooler and choose to stop or restart
Be aware that if you stop the service without starting it afterward, your computer will not be able to print until you either start the print spooler or restart your computer.
Networked HP 1022n printer not printing
I have a user with an older HP 1022n laserjet printer at her desk, and all of a sudden today it stopped working. I found the jobs stuck in the printer queue on our Windows Server 2003 print server, but couldn't get rid of them. Restarting the spooler didn't seem to help either. However, I found an article on experts-exchange.com (membership required) with a solution, and it apparently works for some other HP Laserjet printers that experience the same type of problem. On the printer server, you have to modify two settings for the printer:
1. Log on to your print server, open your Printers, then right-click your HP printer and choose Properties
2. Go to the Ports tab and uncheck the box labeled "Bidirectional Support"
3. Go to the Advanced tab and change the setting for spooling to "Start printing after last page is spooled"
4. Click Apply and OK
I spent quite a while trying to diagnose the issue and come up with a solution because I thought it was related to a recent driver update on the print server. While it likely was related to that update, I would've never thought it to be a problem with the default driver settings. Hopefully this saves you some time if you come across the same type of situation.
Thursday, October 29, 2009
McAfee ePO 4.0 won't update repository or allow manual package check-in
I was running into an issue with our ePO 4.0 server, where it wasn't updating the master repository like it should, and if I tried to manually check-in a package I would get an error that said "Unknown failure processing package". Trying to manually pull updates would also give a -1 error and say nothing was found. This turned out to be caused by the SQL Server install and the ePO server instance trying to communicate on different ports, which is fairly easy to fix and is documented in the McAfee knowledgebase under KB51620.
Instructions are for SQL 2005. If you're using a different version, check KB51620 for other instructions.
1. Identify which port SQL Server is using. To do this, go to Start->All Programs->Microsoft SQL Server 2005->Configuration Tools->SQL Server Configuration Manager
2. Go to SQL Server 2005 Network Configuration->Protocols for mySQLServer->TCP/IP
3. Right-click TCP/IP and choose Properties
4. Go to the IP Addresses tab, then scroll to the bottom where it says IPAll. Make note of the value in the TCP Dynamic Ports box, as this needs to match what your ePO server is set to use.
5. Close the SQL Configuration tool
6. Login to your ePO server
7. Change the URL to https://locahost:8443/core/config in order to access the ePO 4.0 Database Configuration Page
8. Scroll down to the Database Server Port. This value should match what your SQL Server had in the TCP Dynamic Ports box. If not, change it here so it matches your SQL Server and click Save at the bottom.
9. Close your browser
10. Now you have to restart your ePO services. To do this, right-click on My Computer and select Manage
11. Go to Services and Applications->Services
12. Stop the following services in this order: McAfee ePolicy Orchestrator 4.0.0 Server, McAfee ePolicy Orchestrator 4.0.0 Event Parser, McAfee ePolicy Orchestrator 4.0.0 Application Server
13. Start the services in the reverse order, so: McAfee ePolicy Orchestrator 4.0.0 Application Server, McAfee ePolicy Orchestrator 4.0.0 Event Parser, McAfee ePolicy Orchestrator 4.0.0 Server
14. Close the Services window
The KB article notes that doing this may lead to the Event Parser and Tomcat services to have high CPU utilization for a while until it catches up with processing, but then it will go back to normal. This is ok and you should let them finish.
After doing this you should be able to update your Master Repository, run a Pull Now, and also manually check-in packages.
Shared folders on iSCSI drive disappear after restart
I was finally given approval to purchase an iSCSI SAN a few months ago and have been enjoying the benefits of having a large amount of storage space with a RAID6 disk array. However, one problem I had with the iSCSI disk is that if I shared a folder in Windows Server 2003 from any of the logical iSCSI drives on the computer, after a restart the share would disappear and I would have to recreate it. Any shares from the hard drives of the server were fine, it was just affecting shares from the iSCSI disks. The problem is that the iSCSI software doesn't always start running before the Server service does, and since the Server service can't see the iSCSI drives, it doesn't share the folders. Luckily, MS KB870964 gives you the answer to fix this problem.
1. First, make the Server service independent of the iSCSI initiatior. To do this, use the command: sc config LanManServer depend= MSiSCSI
And yes, there is a space after the = and that is supposed to be there
2. Configure persistent logons to the iSCSI disk. To do this, open iSCSI initiator and go to the Persistent Targets tab. If your iSCSI disk is already listed there, then skip this step. If not, go to the Available Targets tab, select your disk from the list, and click on Log On. Check the box named "Automatically restore this connection when the system boots" and click OK.
3. Set the BindPersistentVolumes option for the iSCSI Initiator service. To do this, open iSCSI Initiator, go to the Bound Volumes/Devices tab, then click on Bind All. This should make your iSCSI disks available to the system before it attempts to load the iSCSI service.
There are some alternative methods listed in MS KB870964, so feel free to check that out if the above instructions are not clear or you can't seem to get it to work.
If you're simply looking to find a download location for Microsoft's iSCSI Initator software, you can get that from http://www.microsoft.com/downloads/details.aspx?familyid=12cb3c1a-15d6-4585-b385-befd1319f825&displaylang=en
Friday, October 23, 2009
Group policy assigned software not being installed
I wanted to setup Office 2007 to be deployed through group policy. However, I could get it to work on the machine I was using to test the policy on, even though the rest of the GPO settings set on that OU were being applied correctly. Well, it turned out that it was the gigabit NIC installed in the laptop (IBM Thinkpad T42). Apparently there are some known issues (that I didn't know about) that are more prevalent on gigabit interfaces which cause the policy processing to timeout. Luckily there's a registry hack to fix it.
1. Open the Registry Editor (Start->Run, then regedit and click OK)
2. Go to HKEY_LOCAL_MACHINE->SOFTWARE->Microsoft->Windows NT->CurrentVersion->Winlogon
3. Add a new DWORD named "GpNetworkStartTimeoutPolicyValue" to the Winlogon folder
4. Change the "GpNetworkStartTimeoutPolicyValue" to decimal and give it a value of 60
5. Close the Registry Editor and restart the computer
What this does is extend the timeout for group policy processing from the default of 30 seconds to 60 seconds. As soon as I did this on my test machine the software installed on the reboot. One way you'll notice this may be needed is if you start seeing event 1054 in you Application event log.
I found the answer on experts-exchange.com, which just links to Microsoft KB 840669
Update: 11-19-09
Ran into this again on a Dell Dimension 4550 I was working on. The common denominator appears to be certain older Intel NICs, or at least it has been in all the machines I've had the problem with. Adding the registry key fixed it in this case as well. If you're running into event ID 1054 in your Application event log, try the registry key addition and see if it'll fix your problem. This can also be related to other items within group policy not being applied as well, not just software deployment to computers.
Monday, October 19, 2009
OS X 10.5 Leopard includes better VPN support
We have a simple PPTP VPN setup using a Fortigate firewall, but the Mac OS X 10.4 users had a hard time with it. The problem was that there was no way to set the DNS servers for the PPTP connection within OS X 10.4, so everything had to use IP addresses. It appears that they've fixed this in OS X 10.5 Leopard, and I'm going to guess it is also fixed in Snow Leopard (OS X 10.6). You also do not use the Internet Connect application to configure VPN connections anymore either, but rather the Network section of System Preferences. For a nice guide on where to find this, and how to setup the VPN connection in OS X 10.5, check out this page over at www.publicvpn.com
Saturday, October 17, 2009
Take screenshot of iPhone screen
Sometimes it would be nice to take a quick screenshot of my iPhone screen to be able to use to show someone something. Little did I know that Apple thought of that and it's really easy to do. All you have to do is press the home and power buttons quickly at the same time. The screen should flash as if you had just taken a picture, and then you can find the screenshot within your pictures on the phone. From there you can hook the phone to a computer and get your picture files. This also works as a free way to export andget your text messages off your phone into a printable format, rather than having to buy any software to do it.
This is found right in the manual, on page 80.
Tuesday, September 29, 2009
Restore iPhone with error 13 or 1611 in iTunes
I had a user who accidentally unplugged their iPhone 3G while it was in the middle of updating. It appeared to render the phone useless, and trying to restore it didn't work. I even tried using recovery mode but that didn't help either. iTunes would get to a point where it would say "Preparing iPhone for Restore", then fail with error 13 or error 1611. Needless to say I called Apple iPhone support and they said it was a hardware issue that required me to send it in. However, while I was waiting for the Apple support person to finish writing up my case, I found the answer to fix it without the need to pay or send it away. It's called DFU mode, which is a step beyond Recovery mode. It boots the phone, but doesn't allow the OS to load, which then is supposed to allow you to downgrade, upgrade, or restore the phone. Thanks iHackintosh.com!
To enter DFU mode:
1. Connect your iPhone to your computer
2 . Turn iPhone off. You may have to hold the power and home buttons down together to force the phone off
3. Once the phone is off, hold the power and home buttons together for 10 seconds exactly
4. After 10 seconds, release the power button but keep holding home until the computer recognizes that a USB device was plugged in
5. iTunes should detect your iPhone correctly, and also allow you to restore to the factory default settings
Note that the screen should be black, even though the phone is on and recognized by the computer. If the Restore Logo is present on the phone's screen (it's the iTunes logo, CD with musical notes, and the picture of the cord), you are in Recovery Mode. If this is the case, shut the phone off and start over at step #3.
Thursday, September 24, 2009
Weird iPhone issue when trying to sync with Exchange
Ok, so first off I solved the issue I was seeing, but I have to post it anyway because I spent much too long figuring it out. Secondly, if you're having an error about encryption and you recently upgraded to the iPhone 3.1 OS, this isn't that problem. However, you can find the Apple discussion about that issue at:
The problem I had may be a problem with the iPhone, or it might be an Exchange issue. I honestly don't know, which is another reason I decided to post this. Ok, here goes
I received a new iPhone 3G a few days ago. I already support about a dozen or so iPhone users using Exchange email and have had no complaints. However, I finally ran into something that wasn't normal. We have a single Exchange 2003 server hosting email for a few different domain names. For this to make sense, lets say those domains are email1.com and email2.com. The server itself is in the DNS as exchange.email1.com, which is manually set in the ActiveSync configuration when it asks for the server name. I have successfully setup email for users in both email1.com and email2.com with no problems. Now is where the weirdness begins...
We have a proprietary application that requires users to have no more than 8 characters in their username, but we standardize on using the entire last name in the email address. For an example, let's say we have two employees named John and Tom Anderson. John works the email1.com company and Tom works for the email2.com company. This means their usernames would be janderso and tanderso, but their default email addresses would be janderson@email1.com and tanderson@email2.com. The problem I have found is that this is fine for janderson@email1.com and ActiveSync on the iPhone works correctly. However, tanderson@email2.com has no such luck and the account will verify but will not sync. This is true with SSL turned on or off. On occassion it will work, but eventually it will fail and anything synchronized to the phone will mysteriously disappear and then the phone begins giving errors connecting.
Now what I found will fix this problem is matching the username to the email address. In my case, I was able to change the logon for this particular user since they didn't need access to the proprietary application. Changing the username from tanderso to tanderson, then leaving the email as tanderson@email2.com and reconfiguring ActiveSync on the iPhone worked. This was not required for users with an email address of user@domain1.com who are able to have differing usernames and email addresses without any issue.
I first ran into this with an iPhone with a 3.1 OS installed, but have since been able to test it on the 3.0.1 OS and it failed there as well. Like I said, this may be a problem with the iPhone software or my Exchange server, but since I don't know which it is hopefully if it is an iPhone problem this will save you the time of trying to figure out what is going on.
Tuesday, September 22, 2009
Select preferred DNS or WINS network interface in Windows Server
I recently installed a second NIC card in one of the Windows 2003 servers that I manage. After installation everything appeared to be working correctly, but I noticed that the server was registering the new NIC's IP address in the DNS and WINS consoles. DNS selects to use all available interfaces by default, which I was aware of, so I right-clicked on the server within the DNS console, went to Properties, then removed the new NIC's IP address and selected "Only the following IP addresses" on the Interfaces tab. However, that didn't fix the WINS problem, and I couldn't find any settings within the WINS console for determining which interface should be the primary. After thinking about it for a little while I finally realized what was happening. When you install new NIC cards, they're added to the network services priority list in the order of installation. Since I installed this NIC after the primary NIC, it was made to be the primary by the default system action. All I had to do was change the network services priority list.
1. Open Control Panel->Network Connections
2. Go to Advanced->Advanced Settings...
3. Here you'll find all your connection objects in the Connections section, listed in the priority they're used in. Rearrange them to be in the order you want, with the highest priority connection at the top of the window
4. Click OK
This will make the highest priority connection you set be the first place network services look when trying to use a connection. Sure enough, my newly installed NIC had top priority, so moving it down the list took care of the issue. Connectivity and everything else seemed to be working fine, but it is best to make sure you have the priorities set correctly so the system isn't wasting time trying to use other connections.
Tuesday, September 15, 2009
DVD player software for FREE on your Windows machine
Firstly, this post is meant for Windows users, however the software mentioned is open-source and runs on OS X and Linux as well. One thing I run into occassionally is someone wondering why they can't watch DVDs on their laptop. I know Windows machines come with Windows Media Player, but that never really has seemed to do a very good job of working with DVDs or movie files. I've used Powerlink's CyberDVD before and it performed well, but if it didn't come installed from the factory you likely won't want to pay for it. There are others too, but typically they're installed with your computer and if you ever reformat or want to upgrade, they'll try to hit you with fees. Instead, let me introduce you to VLC Media Player.
VLC is an open-source option, with versions for Windows, OS X, and Linux. Being open-source, it is also free for you to download and use. In my testing I've found it to work well with actual DVDs that were having problems playing in Windows Media Player. There is an entire list of other features as well, but I've really only used it to solve the problems I've seen with playing DVDs. So far so good, and since it's free it's really hard to beat it. If you're running into issues with media playback on your machine, give it a try and let me know about your experience. Good luck!
Thursday, September 10, 2009
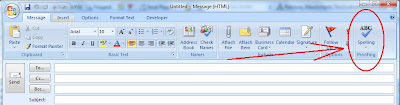
Using Spell Check in Microsoft Word or Outlook 2007
This may be old news to a lot of people, but I was asked by a user today where she could find the spell check in Word and Outlook 2007. She was just recently upgraded, and with the GUI change didn't know where it had went. If anyone else is looking for the spell checking service in Word or Outlook 2007, here's where you can find it. The screenshots look small in the blog, but you can click on them for a better view.

Word 2007
Go to the Review tab at the top, then on the left you will see "Spelling & Grammar"

Outlook 2007
In a new/reply message, it should be on the far right in the menu bar, listed as "Spelling & Grammar"

Thursday, September 3, 2009
"Cannot read from the source file or disk" error when deleting

I've run into the "Cannot read from the source file or disk" problem more than once, and every time it had has to do with trying to delete a file originally created by a Mac from a Windows-based file server. I used to just leave the file in place, but I finally couldn't take it anymore and found a solution: http://blog.dotsmart.net/2008/06/12/solved-cannot-read-from-the-source-file-or-disk/. It appears that the issue is caused by the files ending in a hidden period, which NTFS systems can not read. However, Windows is able to delete it, but it must be done from the command line and requires you to know a special set of characters ("\\?\") to use as a prefix to the file path.
For an example, let's say I get this error on a file with a path C:\myfile.txt. In order to delete myfile.txt, I would have to open a command prompt. From there I would use the command
del "\\?\C:\myfile.txt"
This would remove the problematic file from the system. You can also use this with folders
rmdir /s "\\?\C:\myfolder"
There the rmdir /s will recursively remove all files/folders within the specified folder, and then delete the folder itself. Without using the /s switch, you would have to manually remove all files and folders within the folder you're trying to delete first.
Thursday, August 20, 2009
Fix SYSVOL replication problems
I have four domain controllers, three of which were working fine. The fourth, which happened to be the master of practically everything active directory, wouldn't replicate correctly to the other DCs. The main error I found in the event log was a JRNL_WRAP_ERROR, with some information regarding changing a registry key and performing a non-authoratative restore in order to get replication going again. Well, some further reading suggested against using the registry hack provided in the actual event record citing potential problems, and instead pointed me in the direction of a different registry hack involving a BurFlags registry key entry. Needless to say, I went ahead and used this second suggestion and now all my DCs are replicating correctly again.
You want to make sure you're using this registry hack only on the DC(s) that is reporting replication trouble. You don't need to use it on any other than the problem DC. Also, this will move everything in that DC's local copy of the SYSVOL volume to an Ntfrs_preexisting folder within the SYSVOL share on that machine since this method will repopulate the SYSVOL share from a second DC. Otherwise you would lose anything in the SYSVOL on the problematic DC, which may or may not be a problem. In my case I would've lost the changes I had made to group policy, which was led me to realizing the AD replication was screwed up.
Ok, here's how to fix your SYSVOL replication problem:
1. Log in to the domain controller that is having the replication problem
2. Open the command prompt and type net stop ntfrs, then press Enter. This will stop the file replication service
3. Now open the registry editor (Start->Run, then type regedit and click Ok)
4. Navigate to the following registry key: HKEY_LOCAL_MACHINE->SYSTEM->CurrentControlSet->Services->NtFrs->Parameters->Backup/Restore->Process at Startup
5. In the "Process at Startup" section, you should see an entry for "BurFlags". Open the BurFlags setting and change the value to D2. If BurFlags is not there, you can add it (It's just a DWORD value) and set the value
6. Close the Registry Editor and go back to the command prompt
7. Use the command net start ntfrs and press Enter. This will start the file replication service and start the non-authoratative restore of your SYSVOL folder
After step 7 you can check your event log to make sure that there's an entry saying that the DC you're working on was added to the replication set. You should also be able to notice your SYSVOL share having replicated with a copy from one of the other DCs in your domain relatively shortly after restarting FRS.
The initial post that led me down the correct path can be found here. If you want more detailed info, check out MS KB 290762. There you'll find more information regarding verifying that this actually worked, and also they have steps for a full authoratative restore, along with other help for replication issues.
Friday, August 14, 2009
Using Ctrl Alt Del in a Remote Desktop session
I'm sure anyone who has used Microsoft's remote desktop at one time or another wishes they could use the Ctrl+Alt+Del command on the remote computer. Well, what most might not know is that you can. Ctrl+Alt+Del will always affect the local Windows machine. However, Ctrl+Alt+End will provide the same functionality within a remote desktop sessions, allowing you to bring up the task manager or access the panel that shows up when Ctrl+Alt+Del is normally pressed. You could bring up the task manager by right-clicking the taskbar too, but if the machine you're logged into is having problems with the explorer.exe process (which one of mine is doing right now), the Ctrl+Alt+End command is just the thing you've been looking for.
Monday, August 10, 2009
Remove or find iPhone backup information
If you want to get rid of the backup information for an iPhone it's pretty simple. Open iTunes, then go to Edit->Preferences..., then click on the Devices tab. There you should see all devices you have synchronized with iTunes, along with the date of the most recent backup. To remove a backed up device, simply click on it to select it and then click on the Delete Backup button.
If you're curious where iTunes stores the backup files, I have the location of those as well. You have to unhide hidden files and folders in order to get there though. Go to My Computer->Tools->Folder Options, and then go to View and select Show hidden files and folders. Now, the location depends on your OS.
Windows XP
C:\Documents and Settings\USERNAME\Application Data\Apple Computer\MobileSync\Backup
Windows Vista
C:\Users\USERNAME\AppData\Roaming\MobileSync\Backup
You will see a folder that looks like a bunch of random characters or a GUID. That refers to your iPhone.
Friday, August 7, 2009
Reset iPhone using Recovery Mode
If you run into problems with your iPhone not working with iTunes, you still may be able to reset your phone and get it working again. First off, this was written for Windows users. Recovery mode should work on Macs as well, but some of the other information listed will not be relevant. This process will only work if your computer still recognizes the phone when you plug it in. If not, then your issue needs to be addresses by Apple iPhone support. If you have pictures on your phone that you don't want to lose, you should be able to pull them off prior to resetting the phone. Look in My Computer and you should see an icon for your iPhone. Open it and navigate the folder structure to get to the pictures, then drag them to a folder somewhere on your computer and wait for them to finish copying before continuing.
To start your iPhone in recovery mode
1. Turn the iPhone off and make sure it is not plugged in to your computer
2. Hold down the Home button, which is the button on the front of the phone below the screen
3. Continue holding the Home button and plug the iPhone into your computer
4. Still continue holding the Home button down until iTunes says that it has found an iPhone in recovery mode. At this point you can release the Home button. You may have to manually open iTunes for it to tell you it found the phone
5. You should be able to click on Restore within iTunes, then follow the prompts to reset your iPhone to factory defaults and reinstall the iPhone OS
Be aware that this will delete anything on your phone. If you have it backed up, restoring that backup may just bring your original problem back, so I'd suggest starting the restored phone as a new phone in your iTunes account. If recovery mode is not enough, you could try using DFU mode, which would be the next step. I did have success in DFU mode that recovery mode did not fix. You can find out more about that by checking my other post.
I still wish there was a way to do a factory reset right on the phone without the need for a computer or iTunes. After installing the iPhone OS 3.0 on a few phones, I've noticed that a couple of them have had issues with iTunes, and one even required a complete replacement. Most showed no problems, but for the ones that did, not being able to work in iTunes really limited the amount of troubleshooting a person can try.
Wednesday, August 5, 2009
2GB worth of online backup space for FREE!
Dropbox is a relatively new application that you can get from https://www.getdropbox.com/. It is free to download and use for Windows, Mac, and Linux, but you may want to make sure your flavor of Linux is supported before assuming it is. The software itself provides automatic synchronization of a folder on your computer with the online server. You can install Dropbox on multiple computers, which then allows you to share those files between the machines and also maintain multiple backup sources for those files.
Some of the key features of Dropbox are:
You can also manage your files online through Dropbox's web interface
Photo galleries are created automatically, and can be shared with a simple URL string
Synchronization is automatic and fairly quick from my experiences
Easy to install and use
You get 2GB of storage free, and then have the option to pay for more if you'd like or try to refer friends for additional space (250MB per referral, to a maximum of 3GB for free). The cost is relatively inexpensive though, with 50GB of space costing $10/month.
My cousin had been using Dropbox on a Mac to transfer files back and forth to a Windows machine, and suggested the program to me because he really likes it. After looking into it and using it for a while, it's definitely a nice tool, and for most people the 2GB limit will probably be more than enough for your important files. Feel free to give it a try and let me know how it goes!
If you're just looking to send someone files that are too big to email, check out my other post about a free service called Sendspace.
Wednesday, July 22, 2009
Automate and schedule Microsoft Access macros
If you are running various Microsoft Access databases (haven't quite gotten to SQL yet...) which need to be updated, it's usually nice to be able to automate the updates. While there is no built-in scheduler within Access, you can call macros from the command line, which then means you can script macros through the use of a batch file.
1. Create a new text file with an extension of .bat. You can use save as, or unhide extensions to use the .bat extension
2. In that file, put the full path to the Access executable surrounded by quotes, which will be
Office 2007 - C:\Program Files\Microsoft Office\Office12\MSACCESS.exe
Office 2003 - C:\Program Files\Microsoft Office\Office11\MSACCESS.exe
depending on the version of Access you're using.
3. Now put a space, then add the full path to the Access file you want to automate surrounded by quotes, including the file name. For example, "C:\Access Files\MyDatabase.mdb"
4. Now add a space to the end of that, and add the /x switch, followed by a space, then put the macro name (no quotes needed).
5. Save your .bat file, making sure it stays in .bat format.
6. Go to Start->All Programs->Accessories->System Tools->Scheduled Tasks, and create a new task. When asked what you want to run, browse to your .bat file and select that. Choose the rest of the options according to whatever schedule you want to put the macro updater on
In the end you should have a single line in your batch script that looks something like
"C:\Program Files\Microsoft Office\Office11\MSACCESS.exe" "C:\Access Files\MyDatabase.mdb" /x AutoMacroName
That's it. You now have a fully automated macro on a schedule. There used to be a point in time where we had a user who would start a macro when they arrived in the morning, and then sometime in the afternoon they'd be able to use the updated database. That's very inefficient, and can be a huge waste of time. This automation process can be a great time saver and allow you to update information after-hours, rather than making someone do it manually and wait for the process to finish.
The next thing you might want to look into is adding an email notification to your automated process so you know whether or not it finished. To do that, check out my other post about adding email notifications to ntbackup. The process behind both are practically the same. If you're interesting in more scripting, do a quick search and you should find a few more articles on the site too.
For more command-line switches for Microsoft Access, check out KB 209207
Monday, July 13, 2009
lpadmin error when trying to print in OS X 10.5
This is a known issue in OS X 10.5.7, and Apple has a support article with the supposed workaround. Trying to login as the lpadmin fails, and I'm sure if you found this article you're frustrated with trying to figure out which password you should be using. The trick is to upgrade the lpadmin group to support GUID membership. To do that, you can use a terminal command while logged in as a local administrator.
Try printing now and it should be fine. To see the Apple support page, check article TS2754
1. Go to Applications->Utilities->Terminal
2. Enter the command dseditgroup -o edit -p -a admin -t group _lpadmin and then press Enter
3. You should get a response saying _lpadmin has been upgraded to support GUID membership.
Try printing now and it should be fine. To see the Apple support page, check article TS2754
PS - I have seen this only act as a temporary fix on a few Macs that I have setup to connect to Active Directory. I'm not sure why, so if you run across this and can explain why this works for some AD Macs but not all (as a permanent fix), please leave a comment. Thanks!
Thursday, July 9, 2009
Check which process is using which port in Windows
Ports are used all the time. Some are standardized (25 for SMTP), and others are dynamic. I ran into an issue setting up a TFTP server yesterday where it said it couldn't start because another process was already using the port, even though I couldn't think of any programs I had running that would have had it in use. I had to investigate, and being that it is simple, I thought I'd share the process. Also, matching ports to processes can help catch or track down spyware/malware, which typically uses some type of Internet connection.
1. Open a command prompt. You can do this by going to Start->Run, typing "cmd", and pressing OK
2. Use the command "netstat -a -n -o". This will list all active ports, along with the process id of the process that is using it. Find the port you want to check, then look at the PID listed for using that port. Remember the PID
3. Now use command "tasklist /FI "pid eq yourPID"", making sure to surround "pid eq yourPID" in quotes. This will filter (/FI) your tasklist results, and only show programs using the PID equal to yourPID. Make sure to substitute the numerical PID from step 2 in for the yourPID text in the command.
4. If you'd like to stop the process that you found, use the command "tskill yourPID" to terminate the process, remembering to substitute your process ID value in for the yourPID text.
You can also use Task Manager to track down the process once you have the PID if you would like. However, the PID column on the Processes tab is not displayed by default, so you will have to add that (go to the Processes tab, then to View->Select Columns...). You can then check and end the process with the more familiar GUI interface.
Tasklist is a very helpful tool. One additional use for tasklist is for tracking down programs that are using svchost.exe. If you're interested in that, check out my previous post.
Tuesday, July 7, 2009
Enable LACP on an HP Procurve switch
First off, make sure your switch supports LACP. Not all of them do. If yours doesn't, or at least doesn't out of the box, check to see if there are any firmware updates on HP's site that enable LACP support, which you can find at http://www.hp.com/rnd/software/switches.htm. You also want to make sure that the device you're connecting to the switch supports LACP too, but hopefully you've already done that since you're looking how to set it up.
Ok, to enable LACP (link aggregation control protocol) is pretty easy. You have to have admin access to your switch, and also access to the CLI (command line interface) which you can get through with a simple telnet session to your switch's IP address. There is dynamic LACP, which is more of an automated configuration, but it limits your LACP link to running in the default VLAN only. I believe you can just plug the Ethernet cables into your switch and it will automatically recognize LACP is setup, as long as it is already configured on the device you are connecting. If you have multiple VLANs and need LACP to run in a VLAN other than the default, the only option is to manually set up static LACP, which is what this post is going to cover.
1. Login to the CLI on your switch, which you can do by opening a telnet session to the switch's IP address
2. Enter the username and password when prompted
3. Use the command "config t" to get into the configuration terminal. You'll know this worked when you see (config) appended to the end of your device name.
4. Use the following command to create your LACP trunk of ports: "trunk 1-4 trk1 lacp" then press Enter. This will create a new LACP trunk using ports 1, 2, 3, and 4, and name it trk1. For trk1, you can use anything from trk1-trkX, where X is the last port number on your switch. You can substitute whichever ports you want to use to create your LACP trunk. If you just want to use trunking rather than LACP, simply replace LACP at the end with the word trunk
5. Use the command "show lacp" to check the settings. You should see columns for "LACP enabled", "LACP Partner", and "LACP status". Assuming you already have the device configured for LACP and plugged into your new LACP ports, those three columns should read "Active", "Yes", and "Success" respectively. If the first column says "Passive", go to step 5b. Otherwise skip right to step 6.
5b. Enable Active LACP mode on your trunk ports. To do this, make sure you're in config mode and then use the command "interface 1-4 lacp active", substituting the port numbers you used in your trunk in the command. The command above changes ports 1, 2, 3, and 4 to active LACP mode
6. Now you have to put your new LACP trunk into the correct VLAN. Let's say I want this trunk to be in VLAN 2. To do that, I'll use the command "vlan 2 untag trk1". Substitute the VLAN number and trunk number of the actual trunks you are going to be using
7. That's it. You should now have yourself a static LACP trunk on your HP Procurve switch, and it should be in the correct VLAN for you to start using.
If you want to remove a port from your trunk at some point, you can use "no trunk 1" which would remove port 1 from the trunk. You can use port ranges too, so "no trunk 1-4" would completely remove the trunk that was setup in the example.
For more information, check out the pdf instructions from HP here. To see the original post that pointed me in the correct direction, click here.
Monday, June 29, 2009
Start a Microsoft Office 2007 program in Safe Mode
This is really simple, and can help diagnose issues and problems you may be having with Microsoft Office products, such as Word, Excel, Powerpoint, and Outlook. In order to start the application in safe mode, simply hold down the Ctrl key when selecting it from the Start menu (Start->All Programs->Microsoft Office, then pick the icon of the program you want to open). You will be prompted asking if you want to start the application in safe mode, so assuming you do, select yes to continue.
Microsoft has this posted here
"Cannot start Microsoft Office Outlook" error
I had a user report that she could no longer get Outlook 2007 to open and was getting the error "Cannot start Microsoft Office Outlook. Cannot open the Outlook window." dialog box, as seen below.

It was an Outlook switch I had never heard of before. resetnavpane, and it worked like a charm (thanks d-pabs). Here's how to fix it, and I'm going to assume you're using Outlook 2007. If you run into this issue while running Office 2003, the only difference is the path to the Outlook.exe file should be Office11, not Office12 as shown below
1. Go to Start->Run
2. Type cmd and press OK (alternatively, open a command prompt window however you'd like)
3. In the command prompt window, type "C:\Program Files\Microsoft Office\Office12\Outlook.exe" /resetnavpane and press Enter. Make sure you actually type the quotation marks with the path in this instance since it is required in order for the command prompt to recognize the path to the Outlook executable since there is a space in it.
4. This should start up Outlook and you should be able to get into your email again
Thursday, June 25, 2009
napclientprov.mof error during Windows XP install
First, I'm going to guess that you either tried to slipstream Windows XP SP3 onto your install CD, or you have an install CD that is supposed to contain service pack 3. This isn't a bad thing, but from what I've read, the problem is related to CD's slipstreamed with service pack 3. Anyway, on to the fix.
The good news is that at this point of the install, napclientprov.mof should already be installed on the machine. You can click on Browser, then navigate to C:\Windows\system32\WBEM. You should see the napclientprov.mof file there, which you can then select and click OK to get the installer to continue. I don't have much more of an explanation than that, but it solved the issue for me so I'd expect it to do the same for you.
The good news is that at this point of the install, napclientprov.mof should already be installed on the machine. You can click on Browser, then navigate to C:\Windows\system32\WBEM. You should see the napclientprov.mof file there, which you can then select and click OK to get the installer to continue. I don't have much more of an explanation than that, but it solved the issue for me so I'd expect it to do the same for you.
If you don't know what slipstreaming is, it is when you package Windows updates on your install CD so you don't have to go through all the updates post-install. It can save a lot of time if you have multiple machines to install Windows on, and it's pretty easy to do using a free program called nLite. To read more about how to slipstream updates, check out one of my earlier posts here.
Wednesday, June 24, 2009
iPhone not recognized in iTunes on Windows XP
I had a user who got an iPhone, installed iTunes (8.2), but couldn't get the iPhone to work in iTunes. It is a 16GB iPhone 3G. I took a look and couldn't quite figure it out right away either. I uninstalled/reinstalled iTunes, checked device manager and saw the iPhone recognized as a digital still camera, and kept getting an error from iTunes saying that it detected an iPhone but it wasn't recognized properly and needed to be unplugged then plugged back in. That didn't help. I finally seem to have figured it out, and came up with what I expect caused it to begin with.

First off, I belive the cause of the problem was that the user had first plugged the phone in to the computer while talking on it. This caused the OS to have issues recognizing the phone correctly, which then carried over every time the device was plugged back in. The reason I believe this is because I got it to work, then the user plugged the phone in while talking to me and it stopped working again. Luckily the same fix worked both times, and is quick and easy.
The solution to the problem, once it starts happening, is to update the Apple Mobile Device USB Driver. To do this, follow these instructions:
1. Right-click on the My Computer icon and select Manage
2. In the left tree-view column, click on Device Manager, which is under the System Tools section
3. On the right, expand Universal Serial Bus controllers which is likely towards the bottom
4. You should see Apple Mobile Device USB Driver there. If not, make sure your iPhone is plugged in. Assuming it is there, right-click on it and select Update Driver

5. Choose to allow it to install the update automatically, which should be the default, and click Next
6. It should appear to be doing some searching, then act as if it's installing something, then it will say it is finished. Click the button to close
7. Now try opening iTunes again and see if your iPhone is recognized correctly. Hopefully it is, and you can go on using your iPhone like normal and synchronizing it with iTunes
Once I updated the Mobile Device driver it seemed to work fine. Then the user plugged it back in while talking on it, and the same error started appearing again in iTunes. Again, a quick driver update and the problem was gone. If you're having the same problem and run across this, hopefully it takes care of it and you can stop stressing out over your phone. Good luck
Update: If this doesn't work for you try resetting your phone, then uninstall iTunes, reinstall iTunes, then plug your phone back in. It sounds like a hassle, and it is, but if it'll fix your phone then it'll be well worth it. To restore and reset your phone, check out my previous post. If you can't reset using the normal method you may have to use recovery or DFU mode, which are covered in previous posts as well. Once the phone has been restored to factory defaults (which means you need to choose to set it up as a new iPhone during the restore process), then go ahead with uninstalling iTunes. To do that, follow the uninstall directions in the Apple KB. Once you've uninstalled iTunes, go ahead and reinstall it while making sure to restart your computer in between the uninstall and reinstall. Once iTunes has been reinstalled, plug your iPhone into your computer and let the computer recognize and install it. If this works properly then you can go ahead and use iTunes to restore your phone to the most recent backup of the old settings. If this doesn't work then I'd suggest going right into a DFU mode restore if you didn't have to already, then trying to plug the phone in again. If that still doesn't work then I would say it points at a hardware failure. Be sure to verify your connection cable is working correctly before completely giving up, but if that's not it either then you're stuck relying on the warranty (if you still have one) or using the iPhone as a paperweight.
Update: If this doesn't work for you try resetting your phone, then uninstall iTunes, reinstall iTunes, then plug your phone back in. It sounds like a hassle, and it is, but if it'll fix your phone then it'll be well worth it. To restore and reset your phone, check out my previous post. If you can't reset using the normal method you may have to use recovery or DFU mode, which are covered in previous posts as well. Once the phone has been restored to factory defaults (which means you need to choose to set it up as a new iPhone during the restore process), then go ahead with uninstalling iTunes. To do that, follow the uninstall directions in the Apple KB. Once you've uninstalled iTunes, go ahead and reinstall it while making sure to restart your computer in between the uninstall and reinstall. Once iTunes has been reinstalled, plug your iPhone into your computer and let the computer recognize and install it. If this works properly then you can go ahead and use iTunes to restore your phone to the most recent backup of the old settings. If this doesn't work then I'd suggest going right into a DFU mode restore if you didn't have to already, then trying to plug the phone in again. If that still doesn't work then I would say it points at a hardware failure. Be sure to verify your connection cable is working correctly before completely giving up, but if that's not it either then you're stuck relying on the warranty (if you still have one) or using the iPhone as a paperweight.
Show or hide icons on your Blackberry phone
I've seen this happen to people many times, but sometimes icons seem to disappear from their Blackberry menu and they don't know how to get them back. Sometimes it appears to be completely random, and other times it's probably the user clicking too quickly. Either way, it's easy to hide or show icons. Here's how:
To hide icons
1. Highlight the icon you want to hide
2. Hold down Alt, then press down on the select button
3. Scroll down to Hide and press down on the select button
To show icons
1. On the menu screen, hold Alt and press down on the select button
2. Scroll down to Show All and select it
3. Now you should see all the icons, with the hidden icons looking mostly transparent. Highlight the icon you want to show
4. Hold down Alt, then press down on the select button. Hide should be checked
5. Scroll down to Hide and press down on the select button to uncheck that option
Tuesday, June 23, 2009
iPhone Lite on Verizon's network
I just got out of a meeting with Verizon rep, and in talks with the rep I asked about the likelihood of Verizon getting the iPhone. According to the rep, the iPhone Lite is slated to be released yet this year (2009, but no definite date), followed by the full iPhone on the Verizon network in early 2010. They're also working on their EVDO upgrade, which will be known as LTE (long-term evolution) and that's expected to be implemented in 2010 as well, but this has already been reported by various sources. The iPhone Lite will be a slightly smaller than the current iPhone models, and will also have less memory. For those of us who really just need a phone for calls and email, it'll probably be a good fit rather than the overkill we get with the current iPhones. Tethering was also mentioned, and the rep expects it to be allowed on the Verizon network. From the conversation we had, I'd say AT&T needs to watch out because their reign on the iPhone may be in jeopardy soon.
UPDATE 10/28/2009 - As most of you already probably know, recently Verizon released new iPhone attack ads because of the upcoming release of a Google Android phone on the Verizon network. At this point, it is unlikely that Verizon would do this is they were planning on getting the iPhone themselves, so I think it is safe to say that iPhone users are stuck with AT&T even longer. The good news is that with Google gaining momentum and increasing the availability of their Android phone selection to more providers, Apple won't have much of a choice but to open up the iPhone to other carriers in order to keep up. The problem is that it likely won't happen soon, and the newest thought is that Verizon will be looked at for the iPhone only after they've finished deploying their upcoming LTE network.
Monday, June 22, 2009
Quickbooks Pro 2009 error 15203 73952
We decided to use Quickbooks for a company setup at work, but after installing and getting to the final step to create a new company, we kept getting an error code 15203 73952 and Quickbooks would close. We couldn't get a company file created because of this and without one, there was no point in having the software. The machine was a fresh install of Windows XP Pro, so I turned directly to Intuit's Quickbooks support. The solution, according to them, is to open one of the sample company files installed with the application. Once the sample company file has been opened, go to File->New Company... and set up your new company. It should take you through the Wizard/Interview process again, but this time it should complete correctly at the end. However, this means that if you've already filled out the information from before, you probably will need to do it again. Apparently there is some glitch with the new company setup which can be bypassed by first opening the sample company file and then choosing to create a new company file from there while the sample company file is open.
It sounds like a quick software update would fix that, but maybe the issue isn't causing problems for many other than me since I didn't really find any other information about it on the web. If you're having the issue and find this post helpful, leave a comment and let them know that this is something they should really take care of. If this workaround fixes it for everyone, great, but it's still a programming bug that is a nuisance.
Weird magnifying glass view in OS X
If you've ever been using OS X and ran into a problem with the screen being magnified around the mouse, you're not alone. I get asked about it every now and then by panicking designers thinking that something went really wrong. It's actually a built-in system feature, and is very easy to turn on or off. Go to your System Preferences, then under the System section select Universal Access. You should see a setting for Zoom, which should be turned on. Change that to off and the magnifying glass view will go away.
How to backup or restore and iPhone or iPod touch
I'm working on transferring information from an iPhone 3G to and iPhone 3G S and needed to find out how to backup the information from the iPhone 3G and restore it to the 3G S. It turns out that Apple already has an article written for this, and the process is very simple. It's really just a matter of changing a radio button. Rather than write it all out here, the link to the Apple article is http://support.apple.com/kb/HT1414. This would also cover how to restore settings to an iPhone that stops working like normal, assuming you can still get a computer to recognize the device. It also has instructions for how to update your iPhone, which may be useful with the recent release of the iPhone 3.0 OS
If you're wondering how to change the iTunes account associated with your iPhone, check out this other post.
Wednesday, June 17, 2009
Sharepoint report dashboard access denied error
If you try accessing a dashboard you've created, but instead of getting data you receive an Access Denied error that looks like this


you can fix this by adding the site responsible for holding the data source to the reporting site's trusted locations. To do this:
1. Log in to the Sharepoint central administration
2. From there, go to Application Management
3. Under the Office Sharepoint Server Shared Services section, click on "Create or configure the farm's shared services"
4. Click on SharedServices1 (or whatever you named your shared service process instance)
5. Under the Excel Services Settings section, click on "Trusted file locations"
6. Click on "Add Trusted File Location"
7. Fill out the information listed, directing it to the Sharepoint library you would like to use for your data source. The settings have descriptions and should be self-explanatory
8. After you have your trusted location setup, go back to your reporting page and refresh. Your KPI's, reports, and whatever else should now load correctly since the site can access the data at this point
For the TechNet article, you can find it here
Tuesday, June 16, 2009
Sharepoint Designer 2007 for FREE!
Microsoft has made Sharepoint Designer 2007 free to download now, apparently trying to get more people to jump on the Sharepoint bandwagon. It's a customization tool for Sharepoint sites, without the need to have Visual Studio. It does have some limitations compared to Visual Studio, but is made to be more user-friendly so you don't necessarily need to be a programmer or developer to use it. If you're interested, the direct link to the download page is right here. If you want to learn more about Sharepoint Designer, check out the main page
MOSS 2007 Shared Service Providers stuck on Provisioning in Progress
This was a really annoying glitch during my setup process of Microsoft Office Sharepoint Server 2007. I have a two server farm that I was upgrading to the MOSS 2007 trial (free for 180 days) and was getting stuck while going through the initial setup process when it came time to create a shared service provider. Luckily, after I got frustrated enough, I turned to Google and was able to find an easy solution that fixed my problem right away.
The hang/error is apparently caused by the Sharepoint Timer service, and in order to fix it you must remove the timer service files. This process needs to be repeated on all servers running the Sharepoint Timer service. Here's how to do it:
1. Stop the Sharepoint Timer service. To do this, go to Administrative Tools->Services, then scroll through the list to find it. Select it and choose Stop
2. Now to delete the configuration files for the Sharepoint Timer service. Navigate to %ALLUSERSPROFILE%\Application Data\Microsoft\SharePoint\Config\GUID using the Start->Run box (or whatever other method you want to use to traverse the folders). GUID will be a long, random string of numbers, not literally the text GUID.
3. DO NOT delete the cache.ini file, but delete all the other .xml files you find, leaving the cache.ini file intact
4. Right click on cache.ini and choose Open With. Choose to open it with Notepad and change the number value within the file to 0 and save.
5. Restart the Sharepoint Timer service. This can be done very similarly to how you stopped it in step #1, but by clicking on Start this time instead of Stop.
Now you should be able to successfully create a Shared Service Provider. If you already had one that was stuck on "Provisioning in Progress" it should finish at this point since it continues to retry every so often.
Sunday, June 14, 2009
Transfer browser favorites (IE and Firefox)
If you're an Internet Explorer user, the Favorites folder is in a different spot, depending on whether you use XP or Vista. In XP, go to C:\Documents and Settings\your username\Favorites. If Vista, then C:\Users\your username\Favorites. Take that whole folder from your old computer, then put it in the necessary location on the new computer. Make sure you use the locations listed depending on what operating system each of the computers are using.
If you use Firefox, go to Bookmarks, then Organize Bookmarks. You should see an option for "Import and Backup" here, which you can then use to backup your bookmarks to a file, then move that file to the new computer and repeat the process but import rather than backup
Wednesday, June 3, 2009
Outlook invite time is different in Hotmail or Windows Live
I had a user ask why someone responded to their meeting request asking why the time was so different and had to do some research. My user uses Outlook, and was sending the request to a Hotmail user. The Hotmail user was seeing something similar to this:
| From: |  This Guy (me@outlook.com) This Guy (me@outlook.com) |
| Sent: | Wed 6/03/09 3:08 PM |
| To: | meetme@hotmail.com |
| When: | Wednesday, June 3, 2009, 9:00PM to 9:30PM |
| Location: | Test site |
When: Wednesday, June 03, 2009 4:00 PM-4:30 PM (GMT-06:00) Central Time (US & Canada).
Where: Test site
Note: The GMT offset above does not reflect daylight saving time adjustments.
Notice that there is a When and Location field in the subject displayed in Hotmail, and then there is a When and Where within the body of the message. The body shows the correct time, while the subject section has a time that is 5 hours later than when the meeting is meant to happen. After thinking about this I believe I figured out the answer.
When the appointment is sent to Hotmail, it must use Greenwich Mean Time (GMT) rather than your current time zone setting. Also, since I'm currently located in a place that is in Daylight Savings Time (DST), our time zone is one hour different than it normally would be. I'm in the Central time zone, which is 6 hours earlier than GMT normally, and 5 hours different currently thanks to DST, which would mean a meeting I schedule at 4pm would appear as 9pm in GMT.
I thought this same issue affected Gmail appointments that originate from Outlook too, but after testing it the correct time did seem to be showing in my Gmail account. I'm not sure of any workaround, but submitted this information to Hotmail to see if it's a known issue (support ticket #1103641366). At least this should explain why it's happening for any of you who may have noticed but couldn't quite nail it down.
UPDATE 6/10/2009: This issue is still pending, but I've been working with Windows Live Support to try to solve it. The problem is that I've received emails from 4-5 representatives and have had to practically start over with each of them. The last was them asking for the ok to access my account, which I believe they did today, so I'm hoping to have some type of resolution, or at least acknowledgement soon. If you're having the same problem leave a comment so I can use it to help prove that it's not limited just to my accounts, because that's what they've tried hinting at.
UPDATE 7/2/2009: After many, many emails back and forth with Windows Live support, with them having me repeat the same troubleshooting steps over and over so they could try to blame my time zone settings, I finally received this message:
We receive a feedback from our product team with regards to your issue on time zone. They mentioned that it is by design that the time zone in the event details came from the time zone of the exchange server. While the time zone in the calendar view appears correctly. Windows Live Calendar shows the event in the event time zone.
Apparently that means that they couldn't figure out how to program Windows Live Mail to change the time zone to match that of the Windows Live Calendar settings. Gmail does it, so why doesn't Windows Live? Looks like it is because they don't want to. All appointments are going to be sent out in GMT in order to make sure there is some type of consistent time zone setting. That way the receiving end can look at the time, then reconfigure for their specific time zone settings since everything is based off of GMT anyway. Regardless, it looks like this one was put to bed with a result of Windows Live Mail acknowledging the problem, but then stating it's functioning exactly as designed.
One sidenote to anyone who happens to read this far and is involved in tech support in one way or another. READ an entire question before starting to answer. Sometimes a person just may be smarter than you think, and may have tried their own troubleshooting related to the problem. That can save a lot of time, but only if you bother to read it. I run into this all too often when I am trying to get questions answered by tech support at various places. I know there are a lot of people who don't have a clue out there because I'm in tech support myself, but assuming everyone is clueless makes it very frustrating for those who know what is going on and actually have a legitimate issue with whatever you are supporting.
Problems with Suitcase X1 and Adobe CS4 products in OS X
We recently started an online development group and hired a web designers, so we purchased Adobe Web Premium CS4 to get her started. She complained about issues with Flash crashing and Dreamweaver going really slow right from the start and it took a while for me to figure it out. Then she eventually ended up getting a lot of font errors, whether Suitcase was running or not. I did the usual permissions repair and tried cleaning the font caches, but had no luck. I suspected Suitcase, but wasn't sure. She was running OS X 10.4.11, so I upgraded to 10.5.7, but that didn't help. I had noticed in the Activity Monitor when Dreamweaver CS4 was opened, Suitcase X1's processor usage spiked and stayed high for quite some time. It also listed Suitcase X1 running in PowerPC mode, even though this was an Intel Core2Duo 2.66GHz Mac Pro. Upgrading to Suitcase Fusion fixed the problem and I haven't heard any complaints from her since. There must be some sort of compatibility issue between CS4 and Suitcase X1, whether it's strictly software related, or if it has to do with Suitcase X1 not running natively on an Intel Mac. Either way, upgrading Suitcase is relatively inexpensive and solved the issue right away.
I haven't heard about any issues with Flash CS4 since then either, however I did run across what appears to be an official Adobe developer blog that says they're working on some updates to fix some problems they're seeing. I don't have the exact link anymore since it was a few weeks ago, but if you search the Adobe Forums I'm sure you'll find it eventually: http://forums.adobe.com/community/flash
Monday, June 1, 2009
How to tether a Blackberry Curve 8310 on the AT&T network
AT&T has a pretty good guide for this here. You can also go here for more information. Really, all you should need to do is install the Blackberry Desktop Manager software from the CD that came with your phone, or from Blackberry's website, and also install AT&T Communication Manager. The Blackberry Desktop software installs the device drivers for the phone, and AT&T Communication Manager works to setup the device as a modem. Then just launch AT&T Communication Manager and click Connect, and away you go with Internet access through your Blackberry.
Make sure your plan is setup to have tethering access, which is typically about $15 more a month. Without it you may still get this to work for a while, but you'll end up with a surprise in a bill at some point and are better off just shelling out the extra $15.
If you somehow found this page and are looking for tethering software for the Verizon network, download the VZ Access Manager from vzam.net. That is what Verizon uses for tethering. Again, make sure you call Verizon and set yourself up with a tethering plan first.
If you somehow found this page and are looking for tethering software for the Verizon network, download the VZ Access Manager from vzam.net. That is what Verizon uses for tethering. Again, make sure you call Verizon and set yourself up with a tethering plan first.
Friday, May 29, 2009
How to disassemble a Dell 2005FPW monitor
First off, this is at your own risk. I'm not affiliated with Dell and figured this out on my own, with a little help from this guide. I don't think it's too difficult, but I see a chance for you to break the front faceplate since I was really surprised that I didn't. It's on very tightly, but it is possible to remove. With that said, here's how you can do it:


1. Unplug the power and DVI or GA cable from the monitor
2. Detach the monitor stand. To do this, place the monitor face down on a flat surface and press (and hold) the button on the back right in the middle. Lift up on the stand and it should come right out. The picture below shows the position of the button, with the stand pushed to the left

3. Remove the 4 screws that are now visible on the back, where the stand was attached


4. Flip the monitor onto its back
5. Now the tricky part. You need to pry the faceplate off the rest of the case. This was the most difficult part since the faceplate is on there pretty tightly. I put the monitor on my lap, and started at the bottom middle, placing my fingers on the inside while trying not to press on the screen too much. Be careful around the buttons, as there is a circuit board attached by a ribbon to the rest of the hardware

If you look at the crack between the back of the case and the faceplate, you'll see a couple of slots. They're meant for a screwdriver or some other tool to help you pop the faceplate off. A combination of a tool and your fingers should make it easier for you to remove the faceplate without damaging it.

6. Ok, with the faceplate detached, now you need to get the circuit board off of the faceplate. I used a small straight screwdriver to pry up on it carefully. It's glued to the rubber buttons, but wasn't that difficult to get off. Once you have it detached, you can place the faceplate off to the side since you won't need it until you're ready to reassemble


7. Flip the monitor face down again, being careful with the circuit board and ribbon from the faceplate, and also making sure the screen doesn't fall out. The screen should be easy to remove from the backplate since it's really just sitting in there at this point without any screws or glue. Once it is out, take the stand button and spring off so you don't lose them later on. They're on the back

8. Remove the circuit board that is dangling now. To do so, just lift up on the brown flip clip that the ribbon cable is attached to. Once the clip is up, the ribbon cable should slide out easily

9. To remove the screen from the electronics, remove the four screws holding the screen to the cage you now have. There are two screws on each side. Be careful because there are also cables to disconnect before you can actually separate these two parts

10. Remove the cables connecting the electronics cage from the screen. To do this, first remove the four cables attached on the right side (assuming it's facing down, with the top of the screen furthest from you). They are underneath the thin, aluminum cover that can be removed just by lifting it off. The cables can be pulled out, carefully of course. If needed, use a small straight screwdriver to nudge them along on the sides to start, but they aren't being held in place by any clips so no need to worry about that


11. Remove the other cable attached to the monitor now. This is not attached with a clip either, but a small screwdriver should be used to gently get it started. I suggest removing the side that is on the electronics cage, and leaving the cable attached to the monitor. Once you have the cable out, set the screen aside until you're ready to reassemble


12. Now you have the cage, with the main board and power unit still attached. Time to remove the power unit. Remove the 4 screws in the corners, and also the two silver screws holding the actual power cord receptacle in place. Once those 6 screws are removed you can pull the power unit out, being careful as there are more cords attached underneath

13. There is a ground cable, and another ribbon cable. The ground cable can just be unscrewed from the cage. The ribbon cable is attached with a clip. Using a small straight screwdriver, carefully lift up on the clip while gently pulling back on the cable on the side attached to the power unit. You may need to do this on each side until the clip has gotten behind the latch part, after which you can finish removing the cable. Place the power unit off to the side until you're ready to reassemble

14. Now you just have the cage and the mainboard. There are four screws in the corners holding the mainboard in place, and a ribbon cable. There may also be two additional screws attached to the enclosure, and I've marked those two with a question mark. Unscrew the screws, gently remove the ribbon cable from the right side, then pull out the mainboard

15. That's it, and you have a Dell 2005FPW fully disassembled.
The reason that I ended up doing this is because I had two Dell 2005FPW monitors "die" in the same month. One went into a kind of strobe mode, constantly flickering and making it unusable. The other seemed to have problems staying powered on. I took the two apart to try to make one working monitor, but didn't have any luck. Still, taking things apart can be fun anyway.
I also just found this post, which also gives some directions and was originally designed to tell you how to fix backlight bleed by just using some electrical tape around the edges of your screen. Check it out if you're interested. From the responses, it sounds like this is actually a pretty successful fix.
Subscribe to:
Posts (Atom)