Friday, May 29, 2009

How to disassemble a Dell 2005FPW monitor

First off, this is at your own risk. I'm not affiliated with Dell and figured this out on my own, with a little help from this guide. I don't think it's too difficult, but I see a chance for you to break the front faceplate since I was really surprised that I didn't. It's on very tightly, but it is possible to remove. With that said, here's how you can do it:

1. Unplug the power and DVI or GA cable from the monitor

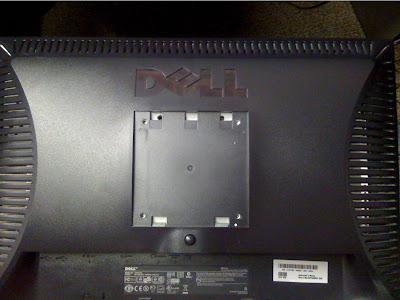
2. Detach the monitor stand. To do this, place the monitor face down on a flat surface and press (and hold) the button on the back right in the middle. Lift up on the stand and it should come right out. The picture below shows the position of the button, with the stand pushed to the left


3. Remove the 4 screws that are now visible on the back, where the stand was attached


4. Flip the monitor onto its back

5. Now the tricky part. You need to pry the faceplate off the rest of the case. This was the most difficult part since the faceplate is on there pretty tightly. I put the monitor on my lap, and started at the bottom middle, placing my fingers on the inside while trying not to press on the screen too much. Be careful around the buttons, as there is a circuit board attached by a ribbon to the rest of the hardware


If you look at the crack between the back of the case and the faceplate, you'll see a couple of slots. They're meant for a screwdriver or some other tool to help you pop the faceplate off. A combination of a tool and your fingers should make it easier for you to remove the faceplate without damaging it.


6. Ok, with the faceplate detached, now you need to get the circuit board off of the faceplate. I used a small straight screwdriver to pry up on it carefully. It's glued to the rubber buttons, but wasn't that difficult to get off. Once you have it detached, you can place the faceplate off to the side since you won't need it until you're ready to reassemble


7. Flip the monitor face down again, being careful with the circuit board and ribbon from the faceplate, and also making sure the screen doesn't fall out. The screen should be easy to remove from the backplate since it's really just sitting in there at this point without any screws or glue. Once it is out, take the stand button and spring off so you don't lose them later on. They're on the back


8. Remove the circuit board that is dangling now. To do so, just lift up on the brown flip clip that the ribbon cable is attached to. Once the clip is up, the ribbon cable should slide out easily


9. To remove the screen from the electronics, remove the four screws holding the screen to the cage you now have. There are two screws on each side. Be careful because there are also cables to disconnect before you can actually separate these two parts


10. Remove the cables connecting the electronics cage from the screen. To do this, first remove the four cables attached on the right side (assuming it's facing down, with the top of the screen furthest from you). They are underneath the thin, aluminum cover that can be removed just by lifting it off. The cables can be pulled out, carefully of course. If needed, use a small straight screwdriver to nudge them along on the sides to start, but they aren't being held in place by any clips so no need to worry about that


11. Remove the other cable attached to the monitor now. This is not attached with a clip either, but a small screwdriver should be used to gently get it started. I suggest removing the side that is on the electronics cage, and leaving the cable attached to the monitor. Once you have the cable out, set the screen aside until you're ready to reassemble


12. Now you have the cage, with the main board and power unit still attached. Time to remove the power unit. Remove the 4 screws in the corners, and also the two silver screws holding the actual power cord receptacle in place. Once those 6 screws are removed you can pull the power unit out, being careful as there are more cords attached underneath


13. There is a ground cable, and another ribbon cable. The ground cable can just be unscrewed from the cage. The ribbon cable is attached with a clip. Using a small straight screwdriver, carefully lift up on the clip while gently pulling back on the cable on the side attached to the power unit. You may need to do this on each side until the clip has gotten behind the latch part, after which you can finish removing the cable. Place the power unit off to the side until you're ready to reassemble


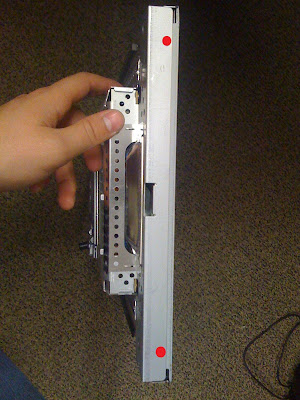
14. Now you just have the cage and the mainboard. There are four screws in the corners holding the mainboard in place, and a ribbon cable. There may also be two additional screws attached to the enclosure, and I've marked those two with a question mark. Unscrew the screws, gently remove the ribbon cable from the right side, then pull out the mainboard


15. That's it, and you have a Dell 2005FPW fully disassembled.

The reason that I ended up doing this is because I had two Dell 2005FPW monitors "die" in the same month. One went into a kind of strobe mode, constantly flickering and making it unusable. The other seemed to have problems staying powered on. I took the two apart to try to make one working monitor, but didn't have any luck. Still, taking things apart can be fun anyway.

I also just found this post, which also gives some directions and was originally designed to tell you how to fix backlight bleed by just using some electrical tape around the edges of your screen. Check it out if you're interested. From the responses, it sounds like this is actually a pretty successful fix.

Wednesday, May 27, 2009

Manually add .NET 2.0 or 1.0 Framework to IIS

Normally ASP .NET 2.0 or 1.0 should be installed automatically for you with IIS, but there are instances when they are not. If that happens, it's pretty easy to add them as options in the web service extensions. Each contains a utility called aspnet_regiis.exe that will take care of it for you. You can find it in the following default locations:

.NET 1.0 - C:\WINDOWS\Microsoft.NET\Framework\v1.1.4322

.NET 2.0 - C:\WINDOWS\Microsoft.NET\Framework\v2.0.50727

You can call use the tool from the command line with the -i switch to install that particular version of ASP .NET in IIS. You could go to Start->Run, then type or copy/paste:

"C:\WINDOWS\Microsoft.NET\Framework\v2.0.50727\aspnet_regiis.exe" -i

and press OK. The command prompt should open and say it is installing whichever version you had chosen. After it finishes, you will then be allowed to control the ASP .NET web service extensions within IIS, and allow them to be used on pages your web server is hosting.

Wednesday, May 20, 2009

Disable DHCP on a Cisco router or wireless access point

If you already have a DHCP server setup, there's no need to leave DHCP enabled on your Cisco router or WAP. It can also lead to other issues since the DHCP scopes and settings may differ, or you may start getting IP address conflicts. To disable the DHCP service:

1. Login to your Cisco router through SSH or Telnet
2. Enter Enable mode by using the en command. Enter the enable password if prompted
3. Enter configuration mode by typing conf t. That will get you to the configuration terminal
4. Type no service dhcp and press Enter. This will disable the DHCP service
5. Type end and press Enter
6. Type wr and press Enter. This will write your configuration changes to memory
7. Type exit and press Enter to leave the SSH or Telnet session

That's it. Now as long as your Cisco router is RFC1542 enabled, it will pass the DHCP requests to your DHCP server rather than handing out IP addresses itself.

Friday, May 15, 2009

Create a virtual CD or DVD drive on your Windows computer

First off, you need to know why a virtual CD or DVD drive would be useful. There are many reasons for this. It allows you to use disk images without the need to burn an actual CD or DVD, and you can then install software that way. You can use it to test a "disk" before you burn it. You can also use it to access various disk image files that may normally require specific software to work with. It's also nice because you can browse the contents of an image file by mounting that image in your virtual drive.

I use Daemon Tools (see below), but recently found out that Microsoft provides a virtual CD-ROM driver for Windows. If you're the type that is weary of third-party software, you can get the Microsoft driver from here.

Daemon Tools is one of the best known applications for accomplishing this. They have a Lite version available, which is free to download. You can download it from http://www.disk-tools.com/download/daemon. To start, download and install Daemon Tools Lite. You'll have to restart your computer during the process since the software has to install a new virtual hardware device.

Once Daemon Tools is installed, you can then run it. The icon will appear on your taskbar by the clock. You will also notice a new CD/DVD drive installed if you open up My Computer. That is your new virtual CD/DVD drive. It can be used to mount disk images, such as .iso, .nrg, .bin/.cue, .ccd, .cdi, and .mds files. There are others as well. Some of the types are normally proprietary and you'd need to have paid for the software in order to use them, so this allows you to use those files for free.


Assuming you have an image file that is of a type that Daemon Tools supports, it's really easy to use. Just right-click the Daemon Tools icons, go up to Virtual CD/DVD-ROM.


Now go over to Device 0, then choose Mount Image. 


From there, select the image file you'd like to use, and that's it. Daemon Tools will mount your image file and you can then use it as if you had put an actual CD or DVD into your CD/DVD drive on the computer.

Friday, May 8, 2009

Find hosts by their MAC address

I've been having an IP conflict issue on my network, and it happens to only affect my Exchange server of all things. In the event log it provides a MAC address and that's it, which makes it a little more difficult to locate the other computer having an issue. But more difficult doesn't mean impossible. Here's how you can search your network by a known MAC address to figure out which machine the MAC is attached to, at least from a Windows machine.

I'm going to assume you and the offending machine are located on the same network, which is 192.168.1.0/24.

1. Open up a command prompt
2. Type ping 192.168.1.255, then press Enter. This will ping the broadcast address, essentially getting a response from every computer on your 192.168.1.0/24 network
3. Now use arp -a > C:\arp.txt to output the content or your ARP table to a text file named arp.txt on your C drive
4. Close the command prompt
5. Open up your arp.txt file
6. Go to Edit->Find...
7. Type in the MAC address you want to find, in the same format as what's in the file (XX-XX-XX-XX-XX-XX)
8. If the MAC address is not found, then that host is not on your network. Assuming it is found, you will then know the IP address of the machine you're looking for
9. Take that IP address to your DHCP server and lookup the host attached to it

If there's a quicker way to do this, please go ahead and post in the comments or provide a link. However, this will work so it you don't have another way of doing it, at least you know how you can now.

I ended up finding that one of the wireless access points was handing out addresses via DHCP that overlapped a block of statically configured IP address, which was easy enough to change.

Tuesday, May 5, 2009

Install .NET Framework 1.1 on Windows Vista

I ran into an issue with running an old VB .NET application on my Vista computer today, and it was because I needed the .NET 1.1 runtime environment. The installation isn't exactly as straightfoward as you would imagine though. Apparently you have to slipstream .NET 1.1 with .NET 1.1 SP1 in order to get the installation to actually take place. Luckily I found a great article with instructions on where to download the files needed and how to install over at mydigitallife.info. Normally I'd rewrite in my own words, but I don't see the need to with the way it's shown there. Here's the link: http://www.mydigitallife.info/2007/12/27/install-microsoft-net-framework-11-on-windows-vista-fix-regsvcsexe-fails-error/

Reset or recover admin password in Mac OS X

This is a lot easier than you'd think, and is more simple on a Mac than a Windows machine. There are a few ways to do this, and I'll cover them here. If you're looking for how to do this on a Windows machine, check out my other post.

If you're just looking to change your OS X user password, this can be done in the System Preferences. Open System Preferences, then go to Accounts. Choose the user you want to change the password of (yourself is the only option if you're not an admin) and click on Change Password. If you want to select a different user, you'll have to click the Lock icon in the lower left of the window and enter your administrative credentials.

Now, if you've just lost or forgotten your password for the computer, or perhaps a user left or was let go and you need to get in to their machine, there are a few ways to reset the administrative password. Those are covered below.

First, if you have the original OS X installation disk then you're able to use the easiest method. This method is even documented by Apple, and can be found here. The trick is to boot your system from the install CD, then use the built-in administrator password reset feature.

1. Put your OS X installation disk into the drive, then restart the computer
2. Hold down the C key while the computer is coming back on. This will force it to boot from the CD in the drive
3. You'll be presented with the initial language selection I believe, so choose your language and go to the next screen
4. You should see a menu across the top at this point. Go to Utilities, then Reset Password
5. Follow the directions to reset the administrator account password, then restart
6. Log in as that administrator and go back to using your computer

If you don't have the installation CD it's still possible to reset the administrator password, which is a bit of a security breach if you ask me. Anyway, this isn't much more difficult but does involve some command line entry. I've done it a few times with success. I couldn't remember the exact commands though, so I had to take them from here

1. Turn on the machine and hold down Command+S. Continue holding this down until the computer boots into single-user mode, which appears to be a command prompt interface
2. Enter the commands in the following order, pressing Enter after each:
mount -uw /
rm /var/db/.AppleSetupDone
shutdown -r now
If the machine doesn't shutdown and restart at this point, type exit and press Enter
3. The machine should restart. It may take a little longer than normal because it has to prepare the first-use wizard, but it'll be ok
4. Go through the first-use wizard to "setup" the machine again. During this process you'll be allowed to create a new administrator account. Don't worry, this process DOES NOT delete any of your files.
5. After you are finished with the first-use wizard you will get logged into the computer. Now you can go into System Preferences and use the reset password instructions from the beginning of this post to change the password of the account you want to access.

I've had success using single-user mode to reset passwords in OS X 10.4. However, I'm not sure if it still works in OS X 10.5. I did find another article that said it specifically worked in 10.5 only. If you're a 10.5 user and need those instructions, you can find them here.


Monday, May 4, 2009

Set your homepage in IE, Firefox, Safari, or Chrome

This may be old news, but I ran across someone on Yahoo! Answers asking how to set their home page. Of course they didn't list the browser, but I thought I'd cover the main browsers with a simple article. Here are the instructions:

Internet Explorer

Go to Tools, then Internet Options. 


On the General tab, set your home page in the Home page box. You can put multiple sites here if you want to have each open in a separate tab.  Then click OK


Firefox

Go to Tools, then Options... 


On the Main button, set the home page box to the site you want to use as your home page


Safari
Go to Safari, then Preferences. On the General button, set your home page in the Home Page box

Chrome

Click the wrench icon in the top right, then go to Options. 


On the Basics button, set your home page in the Home Page section


One thing to note here is that you won't want to set your home page if you like the multi-page display of your most visited pages that Chrome defaults to when it's first installed

Free Winzip and WinRAR alternative in 7zip

7zip is a great, free software package that works well for compressing and decompressing many different compressed file types. This is specifically useful for .zip, .rar, .gzip, .tar, and many others. They list the compatible files on their homepage, www.7-zip.org. If you want to give it a try you can download it for free from http://www.7-zip.org/download.html. It's also nice to have so you don't have to deal with WinZip reminding you that it's not free software and that you're supposed to purchase it.

If you're just looking for a free way to open RAR archives, 7zip is your answer. Simply install 7zip, then right-click your RAR file and go into the new 7-zip option to choose Extract.

Saturday, May 2, 2009

Find out what svchost.exe is running

You've probably ran across a point in time where your computer is running really slow. You check the Task Manager and see that svchost.exe is the program causing the problem, but you probably don't know what it is. Well, it is a generic process that could potentially be running many different things, and most of the time they are important for your system to function. However, spyware/adware, viruses, and antivirus software (just to name a few) sometimes can make svchost act up, which can slow your computer to a crawl. It's a good thing that finding out what exactly is happening behind the scenes of an svchost.exe process that is running rampant isn't very difficult.

1. While in Task Manager and on the Process tab, go to View->Select Columns...
2. Check the box for PID (Process Identifier), then click OK
3. You'll now see a PID column. Find the PID for the svchost.exe process that you want to check on
4. Open up a command prompt window (Go to Start->Run, type cmd, then press OK)
5. Within the command prompt, type tasklist /svc, then press Enter
6. You'll see a list of process on the left, along with their corresponding PID's. Find the match to your PID from step #3. On the right you can see the "Services" column, which tells you what that specific instance of svchost.exe is actually running.

You'll probably have multiple instances of svchost.exe running, and that's normal. It's also the reason why you need to pay attention to the PID in order to make sure you examine the correct instance of svchost. If something looks suspect and you believe you may be infected with a virus or some type of spyware or adware, check out my other posts with links to free software that can help you remove those problems. You can also go back into Task Manager and kill a svchost.exe process that is running unnecessary programs, but if it is some type of virus or spyware, it will most likely be prepared for that and just restart itself as quickly as you killed it.

You can use tasklist for many thing. Another would be to check to see what process is using which port(s) on the computer. If you're interested, check out my other post.