You may have seen the new window snap feature advertised in the commercials for Windows 7, but after using Window 7 for a week I can tell you that it is really annoying. Luckily you can turn it off with one check box. If you're like me and can't stand it, here's how to shut it off.
1. Go to Start->Control Panel->Ease of Access
2. Open the Ease of Access Center
3. Find the "Make the mouse easier to use" link and click it
4. Scroll down and check the box that says "Prevent windows from being automatically arranged when moved to the edge of the screen" and click OK
Now you can move your windows around again without having them snap to positions or automatically resize themselves. If you have trouble following those instructions, try the howtogeek.com walkthrough that has screenshots.
Tuesday, March 30, 2010
Friday, March 26, 2010
Open Excel spreadsheets in a new window
I upgraded my machine to Windows 7 Pro yesterday, and one of the first things I ran into is Excel 2007 no longer opens spreadsheets in new windows. They all get lumped into one Excel window. This can be very annoying if you like working in multiple spreadsheets at once. There are various methods for allowing multiple windows in XP and Vista, but I had a tough time finding one for 7. Luckily, I finally did and am happy to report that it worked just fine on my machine (it's at the bottom of the page). It's a registry hack, so here's what you need to do on each OS (XP, Vista, and 7) in order to open spreadsheets in a new window
For XP and Vista, there a few a different ways reported that allow you to do this. I'll point you in a few different directions, but have not actually tried any myself. I only used the Windows 7 fix.
For both Excel 2003 and 2007, the setting for "Show all Windows in Taskbar" is said to work by some. In Excel 2003 you can find it in Tools->Options->View. In Excel 2007 you can find it by clicking the Windows button in the top right, then going to Excel Options->Advanced. From there scroll down to the Display section and check the box. This solution was posted here
For an XP specific solution, you can supposedly make a change to the file associations to force a new window when opening each spreadsheet. Here's how to do it:
1. Go to My Computer->Tools->Folder Options->File Types, choose XLS, then go to Advanced.
2. Uncheck "browse in same window"
3. In the Actions box, highlight Open and click the Edit button
4. In the "Application used to perform action:" box, remove the /e at the end and instead insert "%1" with the quotes. It should look like this: "C:\Program Files\Microsoft Office\OFFICE11\EXCEL.EXE" "%1"
5. Check the box for "Use DDE"
6. Delete anything that is in the "DDE Message:" box, and leave it blank
7. Make sure "Application:" says Excel
8. Empty the "DDE Application Not Running:" box
9. "Topic:" should say system
10. Click OK twice to get back to the File Types tab
11. Repeat steps 1-10 for the XLSX extension (if it's listed)
For Windows Vista I wasn't able to find a specific fix. However, when I used Vista I had no problem with spreadsheets opening in new windows and do not think I changed anything. If you are having the issue in Vista, I'd suggest first trying to uncheck the "Show all Windows in Taskbar" option named higher in the article. If that doesn't work make sure to go back and recheck that box, and then try using the same registry hack below that fixes Windows 7.
And of course, for Windows 7 you can do the following
1. Open Regedit so you can modify your registry. If you're worried about messing something up make sure to back it up first. You can do that by going to File->Export... and choosing a save location
2. Navigate to "HKEY_CLASSES_ROOT->Excel.Sheet.8->shell->Open"
3. Rename the ddexec folder to something else. If you're feeling brave, delete it
4. Now go into the command folder
5. Within the command folder you will see two keys: (Default) and command. You will want to change both of those, so start with (Default). Double-click on it
6. In the Value data box, delete the /e at the end and insert "%1" instead. Make sure to use the quotes too. Click OK
7. Now do the same to the command entry. Remove /e at the end and insert "%1" instead. Click OK
8. Excel.Sheet.8 refers to .xls files. To change this for .xlsx files as well, repeat steps 3-7 on the "HKEY_CLASSES_ROOT->Excel.Sheet.12->shell->Open" location
9. Close regedit
10. Try opening two spreadsheets. Each should open in their own window now
Hopefully that helps. I know it helped me. Thanks go to Turbo2001rt in the Microsoft TechNet forums for the fix. If you want to see the original TechNet article that helped me, you can check it out here. If you made it all the way through this article and either don't know what an xlsx file extension is for, or do not have xlsx as an option when you change your file type, check out my previous post for info about Microsoft's Office 2007 compatibility pack download.
Hopefully that helps. I know it helped me. Thanks go to Turbo2001rt in the Microsoft TechNet forums for the fix. If you want to see the original TechNet article that helped me, you can check it out here. If you made it all the way through this article and either don't know what an xlsx file extension is for, or do not have xlsx as an option when you change your file type, check out my previous post for info about Microsoft's Office 2007 compatibility pack download.
Wednesday, March 24, 2010
Adobe PDF printer not available in OS X 10.6 Snow Leopard
If you purchased a Mac with Snow Leopard on it and expected to be able to use the Adobe PDF printer, sorry, you can't. According to Adobe this is "due to security features in Snow Leopard that disable the Adobe PDF Printer". They do provide a workaround however, but it requires you to make sure you upgrade to Adobe Acrobat 9.1 (free upgrade if you own Acrobat 9 already). To check for updates, open Acrobat and go to Help->Check for Updates. Now, if you're a Windows user and ran across this post while looking for a way to create PDF files on your computer, check out my previous post for some free software to do just that.
The 9.1 update should give you a "Save as Adobe PDF" option in the menu. This is Adobe's solution to the lack of a PDF printer. I have read a little about a free package called CUPS-PDF, which you can find here. This package allows you to install a virtual PDF printer, just like Acrobat did, and you can get it to work in OS X 10.6 with a few workarounds. I did try setting it up in OS X 10.6 Snow Leopard, and it indeed allowed me to create a virtual PDF printer and print directly to a PDF. If you're interested, check out my other post about installing CUPS-PDF on a OS X 10.6 machine.
To read the Adobe knowledge base article about their issue with Snow Leopard, along with screenshots of their solution, you can find it at http://kb2.adobe.com/cps/509/cpsid_50981.html
Make Outlook mark email as read when it is clicked
The title may be a little confusing, but I don't like waiting to click off of an email in Outlook before it is marked as read. Instead, I'd rather have it mark it as read as soon as I click on it. Luckily, there is a single setting that will take care of this for you.
1. Open Outlook and go to Tools->Options
2. Go to the Other tab, then click on Reading Pane... in the Outlook Panes section
3. Check the box that says "Mark items as read when viewed in the Reading Pane"
4. Set the wait time to something small, such as 1 second
5. Click OK a few times to get back to Outlook
Now your new mail should be marked as read right after you click on it. No more waiting. If you're more of a visual person and want some screenshots, check out the guide for this at howtogeek.com
Monday, March 22, 2010
Resize photos using iPhoto
If you're a Mac user with some photos you want to resize, or even shrink them to take up less hard drive space, you can do it with iPhoto. This does reduce the resolution of the photo, but unless you need high-res for printing out large posters or something similar to that you should be fine. If you're a Windows users then I suggest downloading Axiom PicSizer, which is a free utility that will resize individual photos, or entire folders.
To resize photos using iPhoto:
1. Open iPhoto and choose the library the photos you want to resize are in
2. Select the photos you want to resize, or you can resize the entire folder. Once you have the photos selected, move to the next step
3. Go to Share->Export...
4. Change the Format box from Original to JPG. This will also enabled the resize proportions boxes
5. Select "Scale images no larger than" and define the proportions you want to resize the photos to
6. If you want to change the names at all, look at the options on the right side and pick them accordingly
7. Click Export at the bottom
8. Choose the location you want to save the newly resized images to and click Ok. If you selected the same folder as the original photos it will overwrite those originals unless you defined some naming rules in step #6 to distinguish the resized files.
After the export finishes you should have a new set of photos that take up a lot less hard drive space. I used this last week to resize a folder of photos to a resolution of 800x600, and that folder went from 5.3GB to 180MB.
Friday, March 12, 2010
Reset print spooler in Windows XP
If you were looking for a way to reset the print spooler on a Mac but ran across this article, check out this previous post. Otherwise, here was the situation. I had a user who was having issues printing on a Windows XP computer. The print spooler would crash, and even if the spooler was running the Printers folder would lock up if you tried to look at it. I did some digging and found an article that solved my problem, and also pointed to Microsoft KB 324757. I tweaked the steps a little to fit my situation, and didn't use safe mode, but it still worked. Here's what to do:
1. Stop the print spooler service if it's running, but leave the window open because you'll need to start it again at the end. If you don't know how to stop or restart the spooler, check out my previous post
2. Navigate to C:\Windows\system32\spool\printers\ and delete all the files you find there
3. Now go into C:\Windows\system32\spool\drivers\w32x86\ and delete all the files you find there
4. Open the registry editor. To do that, go to Start->Run, then type regedit and click Ok
At this point make sure you follow the directions exactly. Any changes to the registry are immediate, and have the potential to corrupt your Windows install if not done correctly.
5. In the registry editor, navigate to HKEY_LOCAL_MACHINE->SYSTEM->CurrentControlSet->Control->Print->Environments->Windows NT x86
6. Expand the Windows NT x86 key. You should only see "Drivers" and "Print Processors". If there is anything else there delete it
7. Expand "Drivers", then expand the Version-x folder. I'm guessing it will be Version-3 for most of you, but the number may differ. Delete all the folders within the Version-x folder. These correspond to drivers installed on your system
8. Now go to HKEY_LOCAL_MACHINE->SYSTEM->CurrentControlSet->Control->Print->Monitors
9. There should be 5 keys here: "BJ Language Monitor", "Local Port", "PJL Language Monitor", "Standard TCP/IP Port", and "USB Monitor". If you have any others, delete them.
10. Close the Registry Editor
11. Start the print spooler service
12. Restart the computer and reinstall your printer(s)
If your print spooler still doesn't want to run, then you likely have a much deeper issue. Otherwise this should solve the problem and you should be able to install your printers again at this point.
Wednesday, March 3, 2010
How to rename a Windows 2003 Active Directory domain controller
Have you ever run across a domain controller you didn't setup and wanted to change the name? You can, and it's not that difficult. In order to make sure everything in active directory updates correctly, you'll want to use NETDOM, which is included in the Windows 2003 Support Tools download. If you don't already have that installed, you'll want to download and install the support pack first. Then on to the next step.
This is a three step process. First you add an alternative name for your DC to AD, then you make that alternative name your primary name, then you remove the old primary name which will at this point be the alternative. In between each step you'll want to wait until the change has been replicated to your other DCs before proceeding. You can check this using ADSIEdit.msc to look at the directory partitions on those other servers.
To start things off, go to Start->All Programs->Windows Support Tools->Command Prompt (or just open a command prompt). To add an alternative name for your DC, use the command
netdom computername yourDC.domain.com /add:newDCName.domain.com
This will add an alternative name of newDCName.domain.com to your DC named yourDC.domain.com. Just make sure to replace newDCName.domain.com with the name you want the DC to have, and yourDC.domain.com with the current name you want to get rid of. Wait for the alternative name to replicate, then move on to the step of promoting the alternative name to the primary. To verify the replication, use ADSIEdit.msc to look at the Domain partition on your other DCs. Look at Domain->OU=Domain Controllers, then right-click on CN=newDCName and go to Properties. If the change above has replicated to the server you're looking at, you should find a value of newDCName.domain.com under the msDS-AdditionalDnsHostName attribute
netdom computername yourDC.domain.com /MakePrimary:newDCName.domain.com
This will promote your alternative name to the new primary name for your DC. Once that change has been replicated to the other DCs within your environment, the only thing left is to remove the old name completely. Once this change has replicated to a domain controller, the msDS-AdditionalDnsHostName attribute should have the value yourDC.domain.com. You can check that on your DCs using ADSIEdit.msc again
netdom computername newDCName.domain.com /remove:yourDC.domain.com
This will remove references to the old hostname yourDC.domain.com, leaving you with a machine named newDCName.domain.com. If you're having problems following this guide, try the original one that helped me get through the rename process. If can be found by following this link to petri.co.il
This will remove references to the old hostname yourDC.domain.com, leaving you with a machine named newDCName.domain.com. If you're having problems following this guide, try the original one that helped me get through the rename process. If can be found by following this link to petri.co.il
Tuesday, March 2, 2010
Can't save table design changes in SQL Server 2008
The default settings in SQL Server 2008 do not allow you to modify and save the design of a table if it requires that table be dropped and recreated. Instead, you'll get a nice error message that looks like this
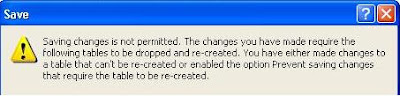
This is nice if you don't want to accidentally change the design of a table, but I have a feeling most people that are in the SQL Management Studio application are using it for just that. The good news is this is easy to fix and only requires you to change one thing.
Within SQL Management Studio, go to Tools->Options->Designers->Table and Database Designers, then uncheck the box that says "Prevent saving changes that require table re-creation" and click OK. That's it, now you can change the design of your SQL table(s) and save them.

Thanks to vinodummy.com for pointing me in the right direction
Subscribe to:
Posts (Atom)